Booking Setup Guide (from zero to taking real reservations)
This guide is the scenario-style manual you should read first. If you're setting up Booking for the first time, work through the page from top to bottom.
Note on screenshots: The screenshots show the Japanese UI. The English UI follows the same layout, just with translated labels.
About the design philosophy: UnlockOS Booking is designed differently from existing reservation SaaS. Instead of "selling calendar slots," we start from "slicing physical access rights (keys) by time." Payment and key delivery happen in a single URL. The moments that hurt operators most — late-night check-ins, overtime charges, mis-sent PINs, double-booking resolution — are wired into the design itself, not patched on as features. The steps in this guide assume that foundation.
The Whole Picture (9 Steps)
The order matters. Most steps depend on the ones before them — we strongly recommend going through them in order.
[1] KEYVOX integration ─────┐
[2] Stripe integration ─────┤
[3] Base settings ──────────┼──→ [4] Plans ──→ [5] Booking > Plan Config ──→ [9] Test booking
     ├ Slug                 │                                  │
     ├ Room Types           │                                  │
     ├ Rooms                │                                  │
     └ Lock assignment ─────┘                                  │
                                                              │
[6] Google Calendar (optional) ──────────────────────────────┤
[7] Check-in Config (optional) ──────────────────────────────┤
[8] Form Config (optional, independent of Check-in) ─────────┘
| # | Step | Required / Optional | Time | Depends on |
|---|---|---|---|---|
| 1 | KEYVOX integration | Required (if you issue keys) | 5 min | — |
| 2 | Stripe integration | Required (for online payments) | 15 min | — |
| 3 | Base settings (Slug / Room Types / Rooms / Lock assignment) | Required | 30–60 min | 1 (lock assignment only) |
| 4 | Plans (Hourly / TimeSlot / Accommodation) | Required | 10–30 min | 3 |
| 5 | Booking > Plan Config | Required | 10 min | 3, 4 |
| 6 | Google Calendar | Optional | 5 min | 3, 5 |
| 7 | Check-in Config | Optional | 15 min | 4 |
| 8 | Form Config | Optional | 10 min | — (independent of Check-in Config) |
| 9 | Test booking in the Booking app | Required | 10 min | 1–5 (and optionally 6, 7, 8) |
Total estimate: 90 minutes to 2.5 hours (varies with scale)
Step 1: KEYVOX integration
Purpose
Let UnlockOS operate the smart locks at your facility. With this, keys are issued automatically at check-in.
Facilities that don't issue keys (e.g., physical key handoff after check-in) can skip this step. In that case, you can also skip the lock assignment in step 3.
Prerequisites
- A KEYVOX account
- In the KEYVOX dashboard, the target facility's places (Place) and doors are registered, and lock devices are bound to those doors
Steps
- Open App Integrations from the main app's left menu
- From the tabs at the top, select KEYVOX
- Click Sign in with KEYVOX
- Complete OAuth authentication with your KEYVOX account
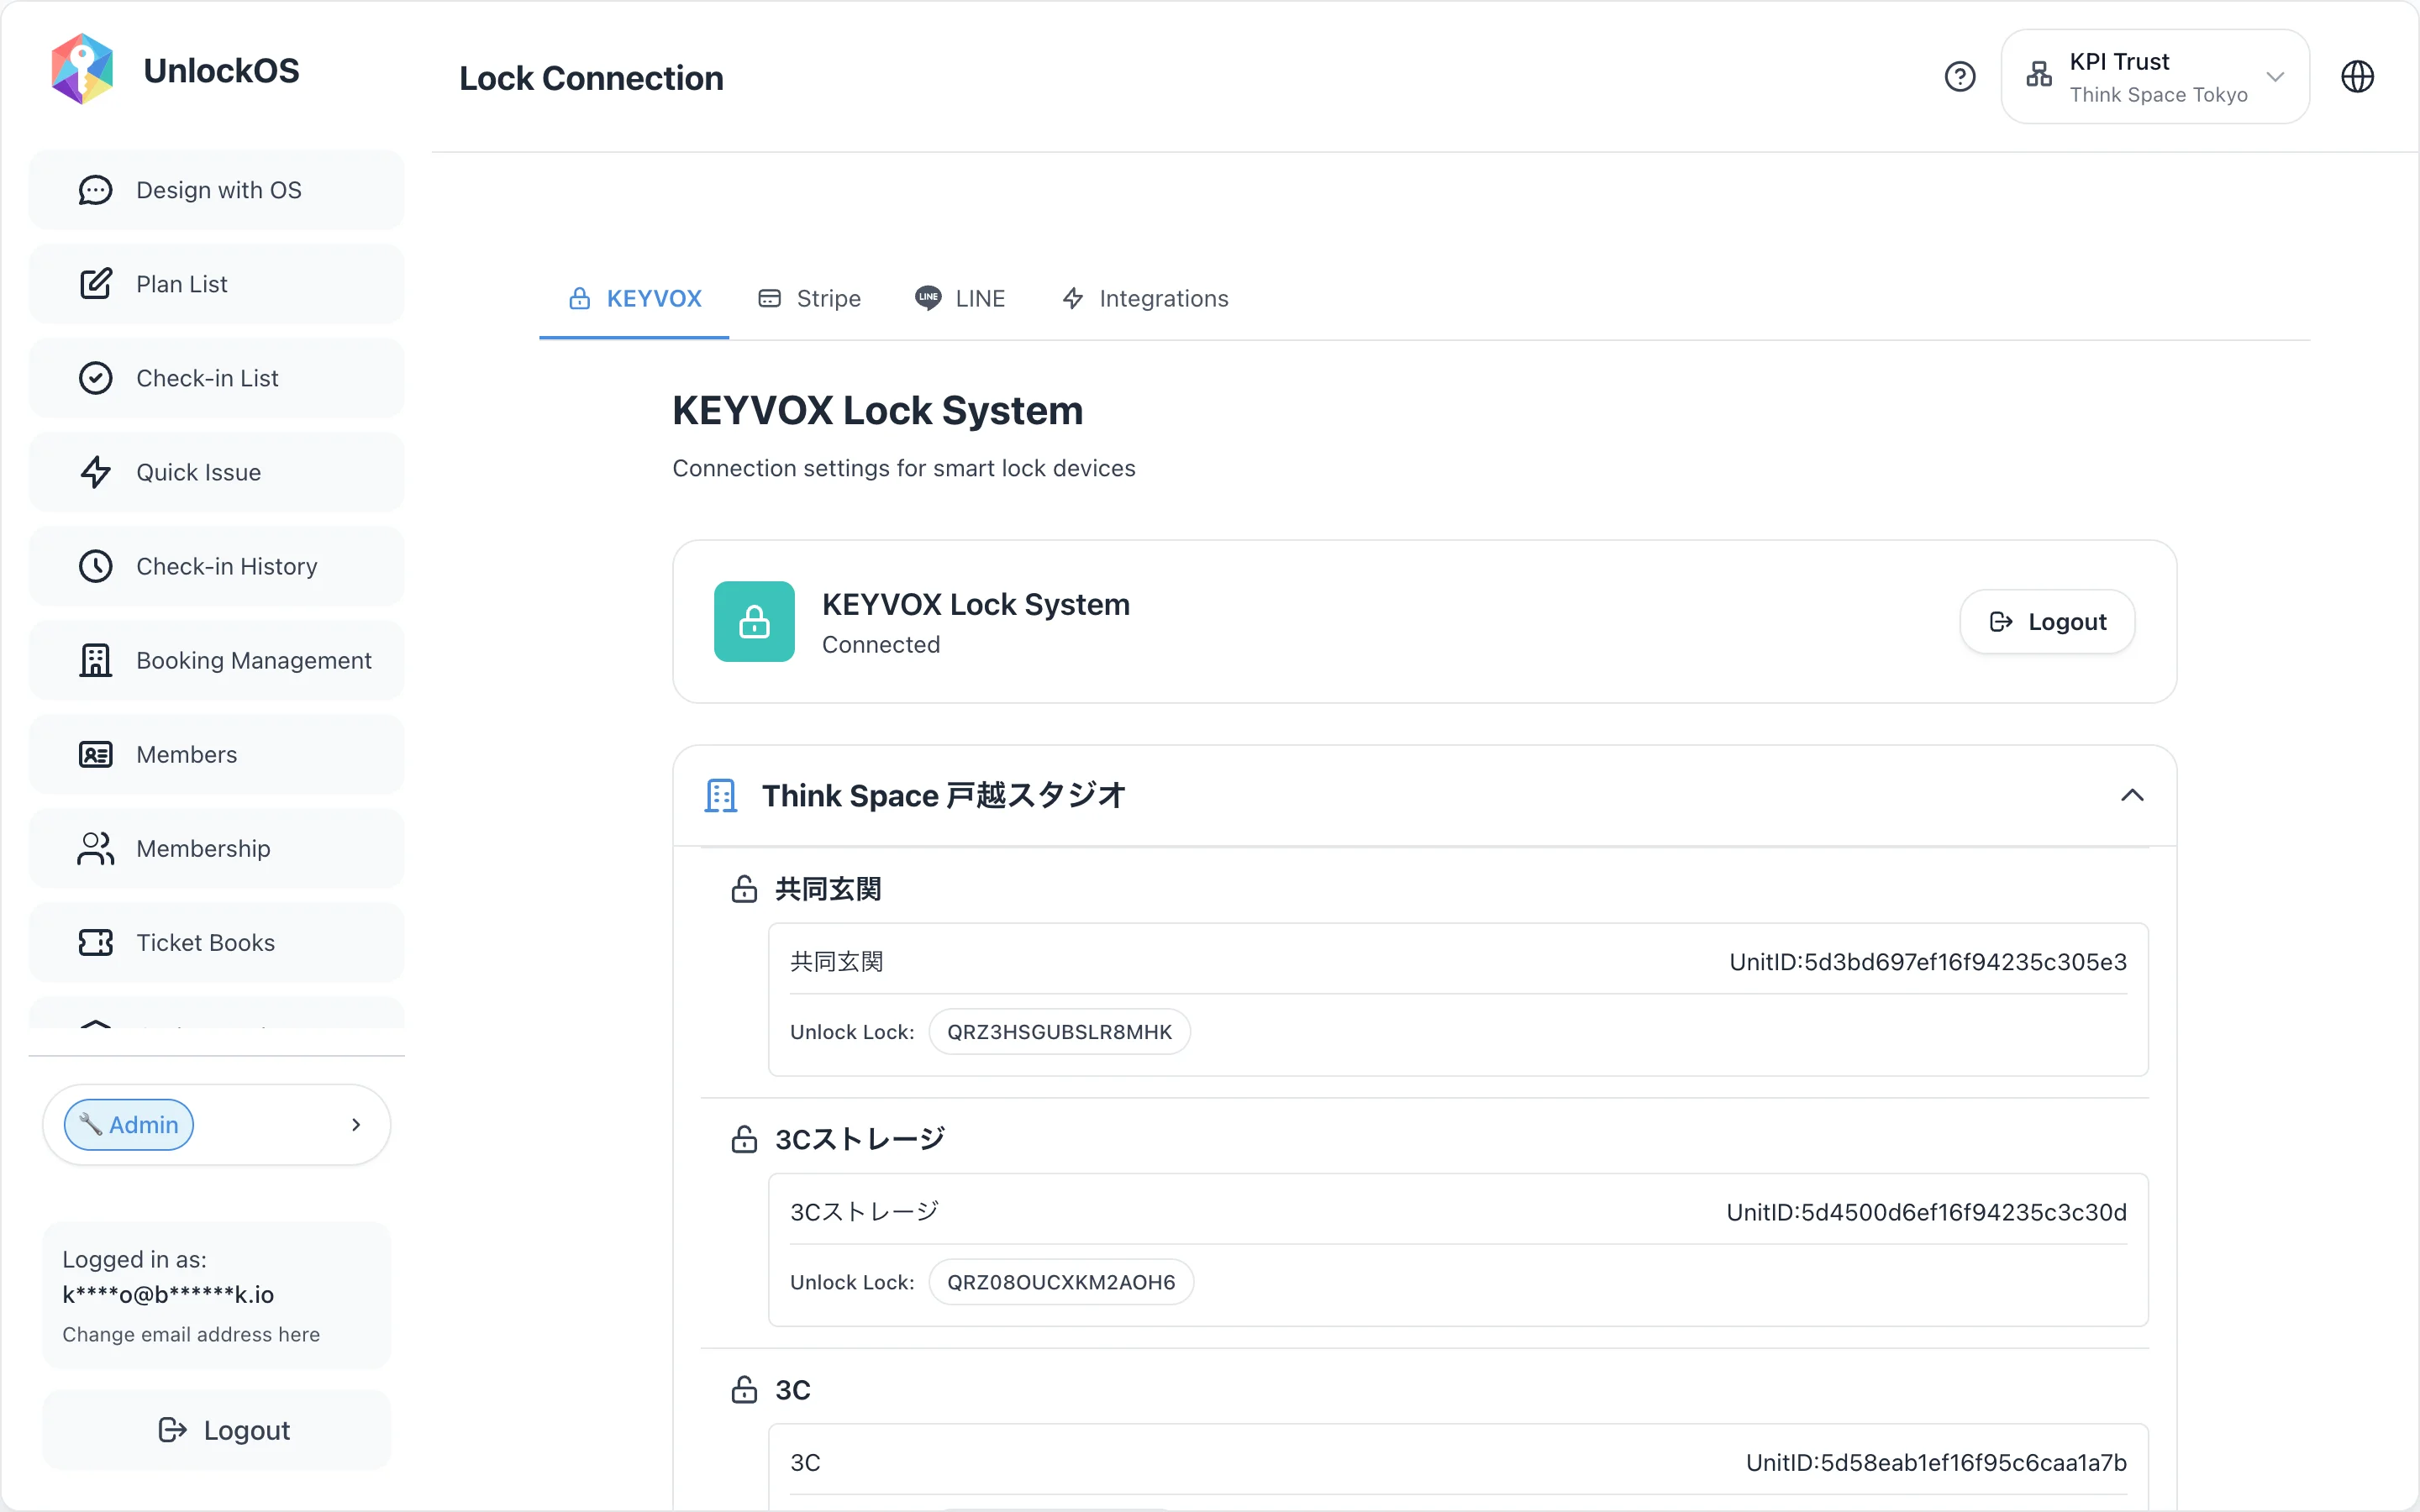
- After authentication, confirm that registered lock devices appear, grouped by place (Place)
Verify
- The KEYVOX Lock System card shows the "Connected" label
- Registered places (e.g., "Think Space Togoshi Studio") and their doors (entrance, storage, etc.) are listed
- Each door has a UnitID assigned
If the list doesn't show up, check that the facility's doors and lock devices are correctly bound on the KEYVOX side.
About the "unlock target" selector: Each door shows an "unlock target" selector here, but the actual room ↔ lock binding happens in step 3-4. For this step, you just need to confirm that the devices appear in the list.
Details
- Lock Connection help — connection flow, troubleshooting, sign-out
Step 2: Stripe integration
Purpose
Enable credit card payments online. Charges for pre-payment, post-payment, deposits, and so on can run at check-in.
Facilities that only accept cash / bank transfers / invite codes can skip this step. But it's required if you want immediate payment at booking time.
Prerequisites
- A Stripe account (free to create)
- The following keys obtained from the Stripe dashboard:
- Publishable Key —
pk_test_...orpk_live_... - Secret Key —
sk_test_...orsk_live_... - Webhook Secret —
whsec_...(optional, only if you use webhooks)
- Publishable Key —
Steps
- Open App Integrations from the main app's left menu
- From the tabs at the top, select Stripe
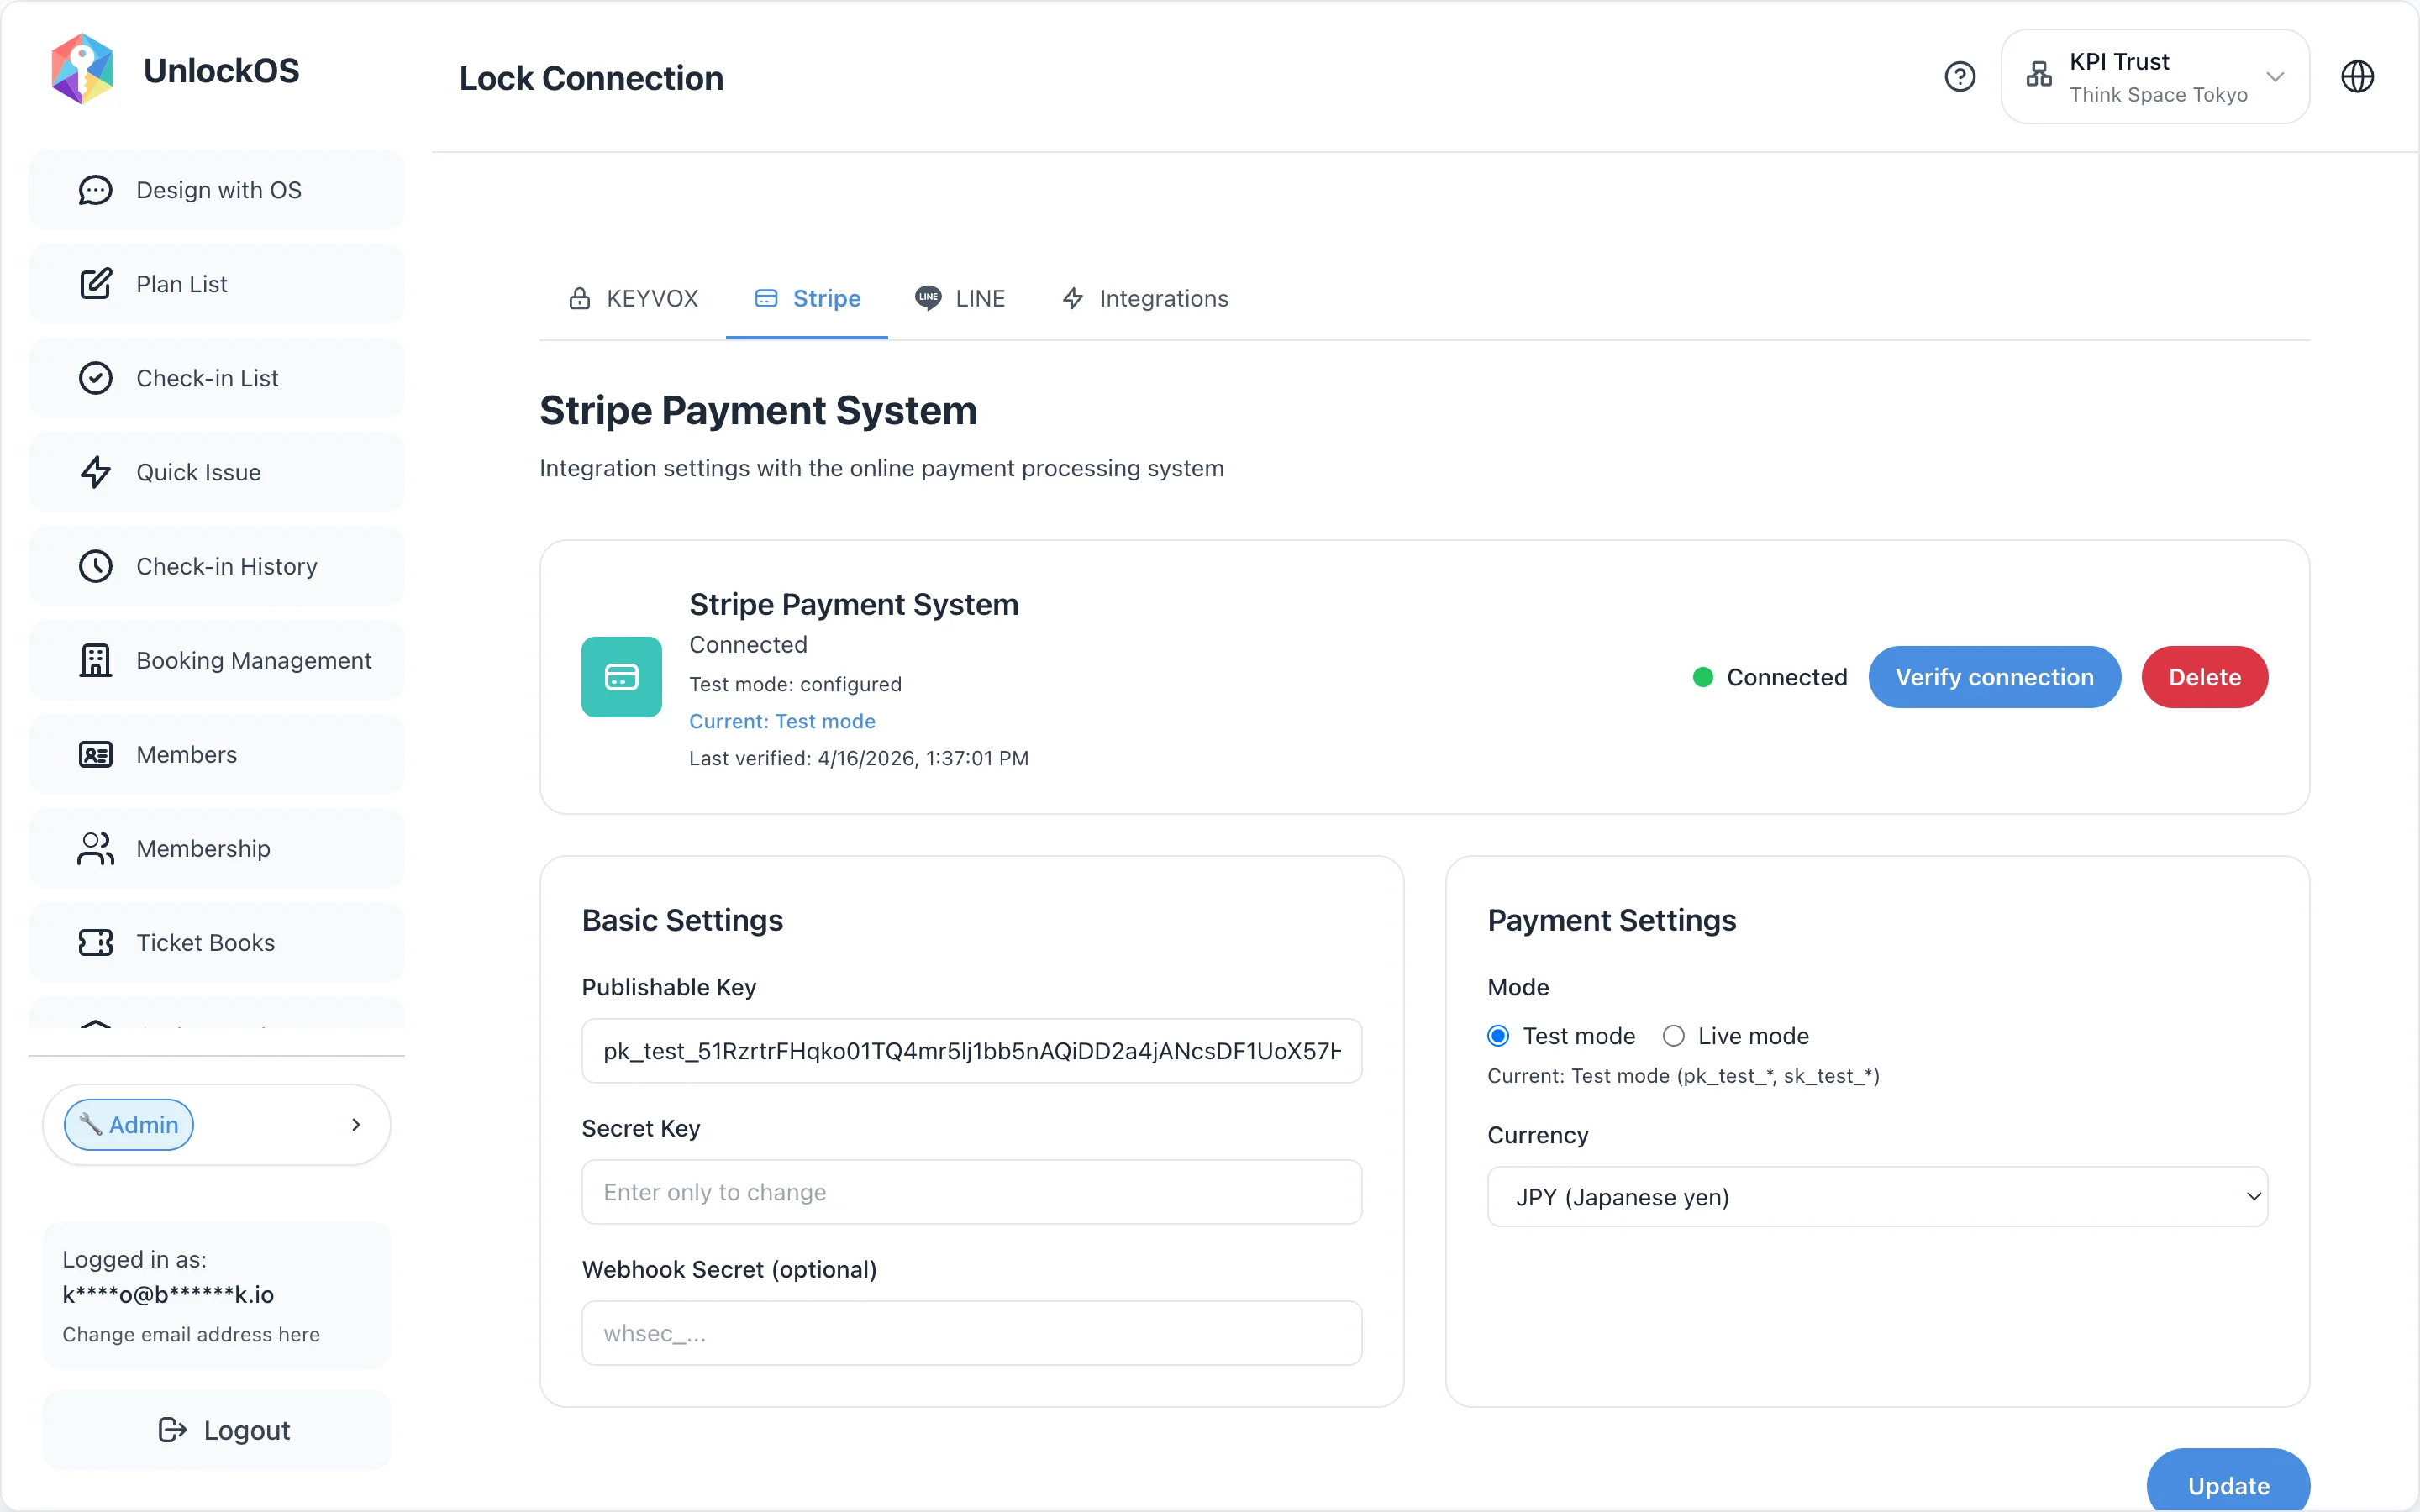
- Paste the three keys copied from the Stripe dashboard into the Basic Settings fields
- In Payment Settings, choose mode (test mode / live mode) and currency
- Click Save
Verify
- The Stripe Payment System card badge turns to "Connected" (green)
- In step 5's "Plan Config," you can now set currency and payment timing
Details
Test mode vs live mode: Always start in test mode (
pk_test_*/sk_test_*) for testing. We recommend switching to live mode only after the test booking in step 9 succeeds.
Currency: Currently one currency per facility. For multi-currency needs, please contact us.
Step 3: Base settings (Slug / Room Types / Rooms / Lock assignment)
Purpose
Register the facility's physical information in UnlockOS. This is the biggest stumbling point. Order matters — go through 3-1 → 3-2 → 3-3 → 3-4 in sequence.
Everything happens in the Base Settings page (left menu "Base Settings," or the gear icon at the top). The page has 4 tabs: Facility Basics / Organization / Facility / Rooms. From 3-2 onward, you'll use sub-tabs under "Rooms."
3-1. Slug (facility URL identifier)
Purpose
Set a short identifier (e.g., thinkspace, sakura-mansion) that becomes the base for guest-facing booking URLs, delivery URLs, and so on.
Steps
- Open Base Settings from the main app menu
- Stay on the default Facility Basics tab
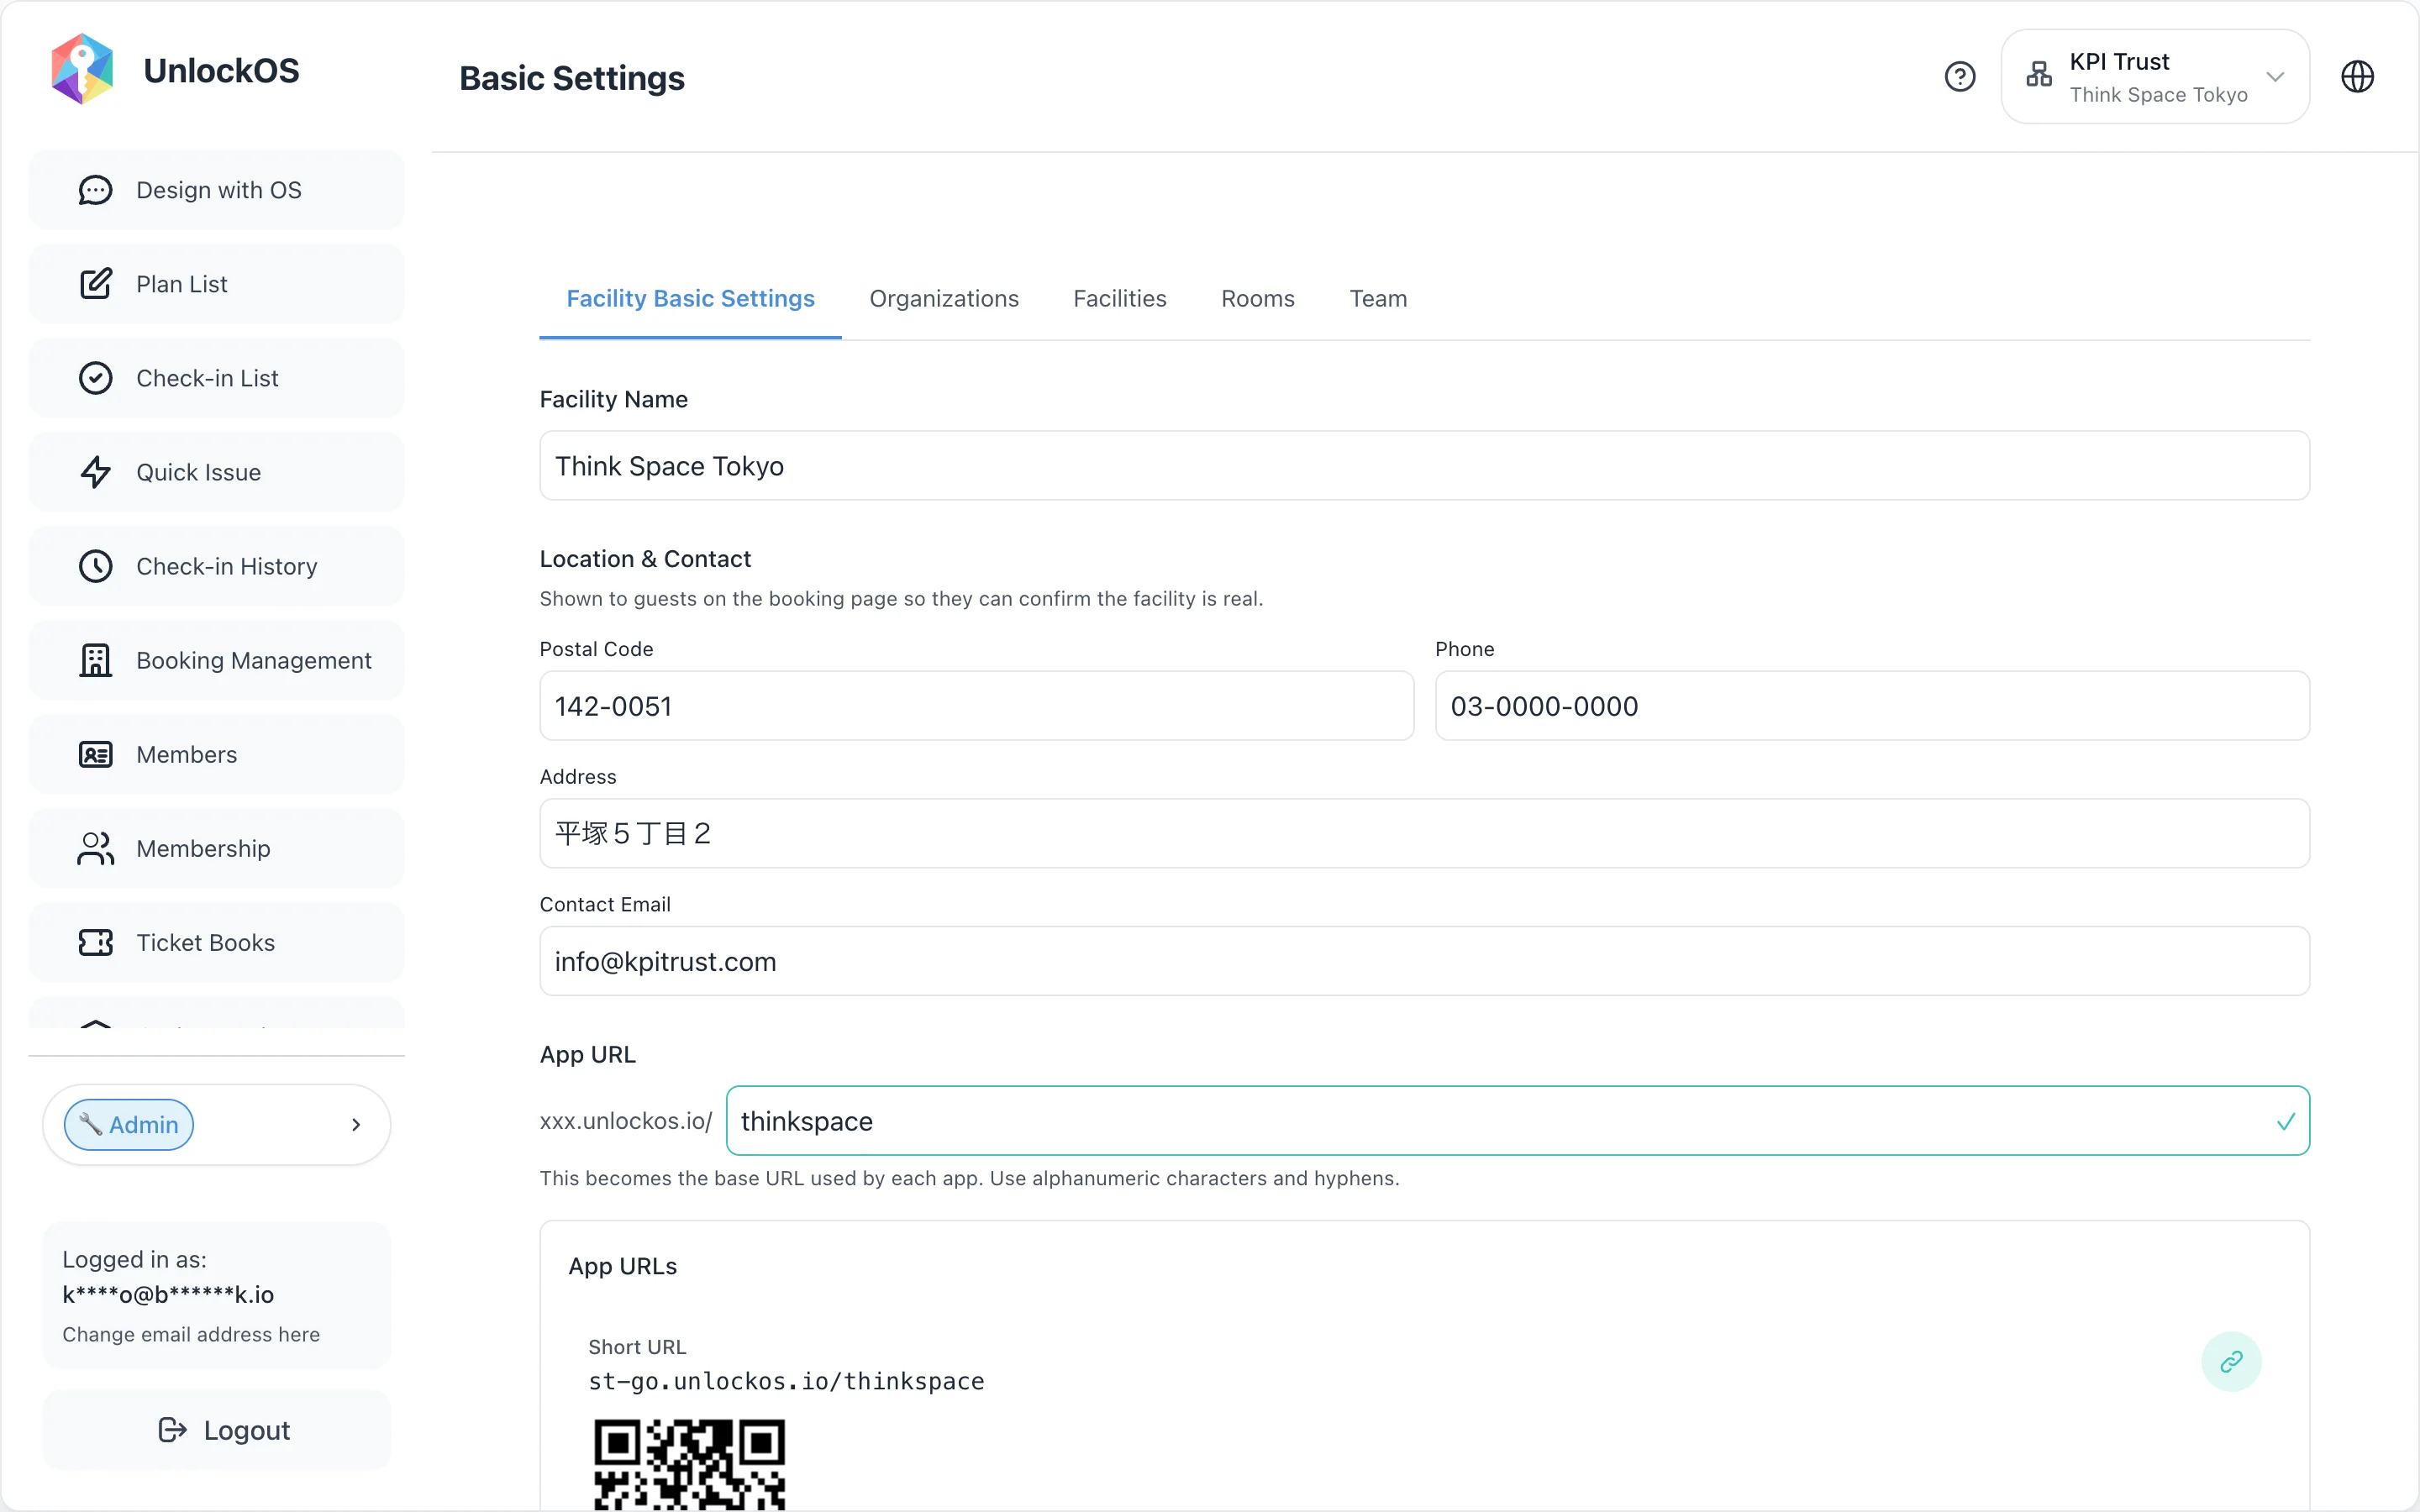
- Enter your desired slug in the App URLs field (lowercase letters, digits, hyphens, 3 characters or more)
- Real-time uniqueness check runs as you type — a green checkmark (✓) means it's available
- Click Save
Verify
- Below the slug input, an App URL list panel appears (short URL
go.unlockos.io/{slug}+ QR code, etc.) - The booking URL field is now in
booking.unlockos.io/{slug}format
Caution: When you change the slug, previously distributed delivery QR codes become invalid. Be careful changing slugs after going live.
Details: Base Settings help
3-2. Add Room Types
Purpose
Define groups that share the same pricing structure — for example: "Studio," "Coworking space," "Private rental," "Double room." Plans are bound at the Room Type level.
Steps
- Base Settings → top tab Rooms
- Select sub-tab Room Types
- Click New in the top-right
- Enter name, description, booking type (Exclusive / Shared), sort order, etc.
- Exclusive: Under Assigned rooms, pick the rooms that belong to this type. Total units (how many can be booked at once) is auto-calculated from the number of assigned rooms — there is no manual entry (if no rooms exist yet, add them first in 3-3).
- Shared: Enter the seat count (shared capacity).
- Save
Verify
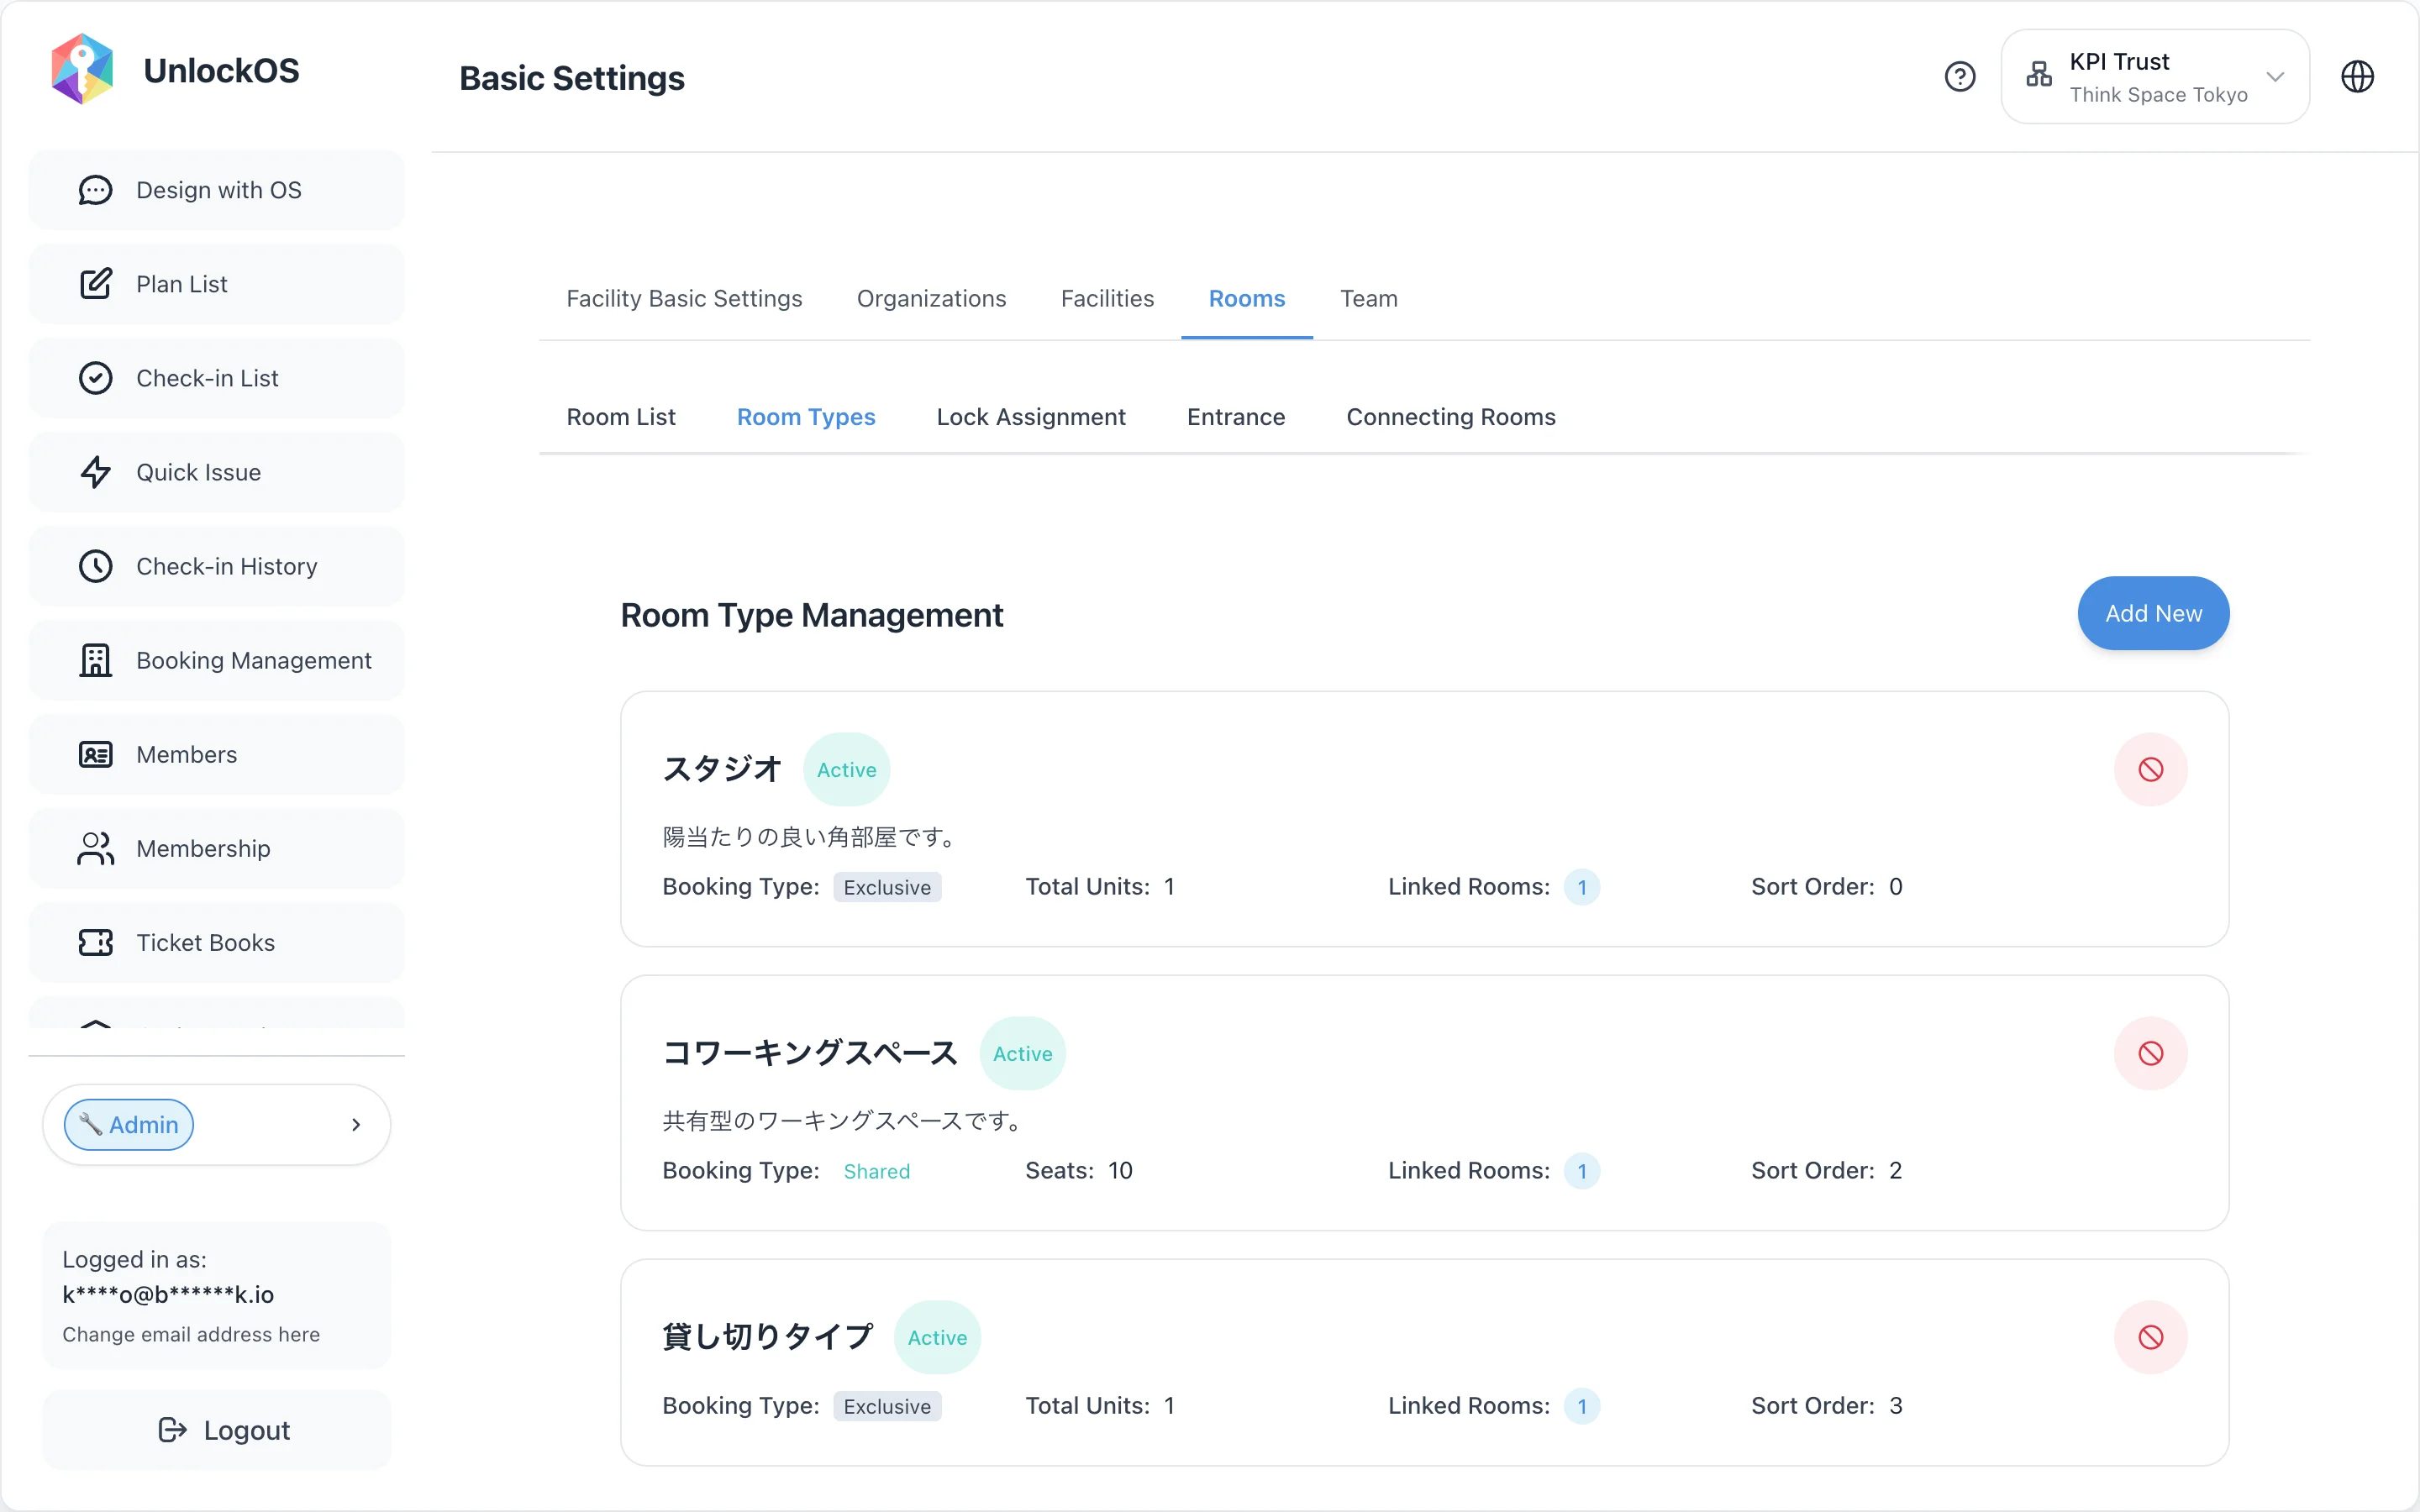
- The new entry appears in Room Type Management with an "Active" badge
- The booking type (Exclusive / Shared) is what you intended
Exclusive vs Shared:
- Exclusive: One room used by one guest at a time (hotel rooms, private studios). Pick the member rooms under Assigned rooms and total units is auto-calculated from the number of assigned rooms (it updates automatically as you add or deactivate rooms), so availability and booking always match the real room count
- Shared: One space shared by multiple guests at the seat level (coworking, share lounges). Set seat count
Design tip: Plans are bound at the Room Type level, so group rooms that sell at the same price. Conversely, if you want different prices for rooms of the same size, make them separate types.
3-3. Add Rooms
Purpose
Register individual rooms (e.g., 3A, 3C, Private). Each room belongs to one Room Type.
Steps
- Base Settings → Rooms tab → Rooms sub-tab
- Click Add Room (or Bulk Add) in the top-right
- Enter room name (e.g., 3A), floor, parent Room Type, category, occupant count, etc.
- Save
- Repeat for each room
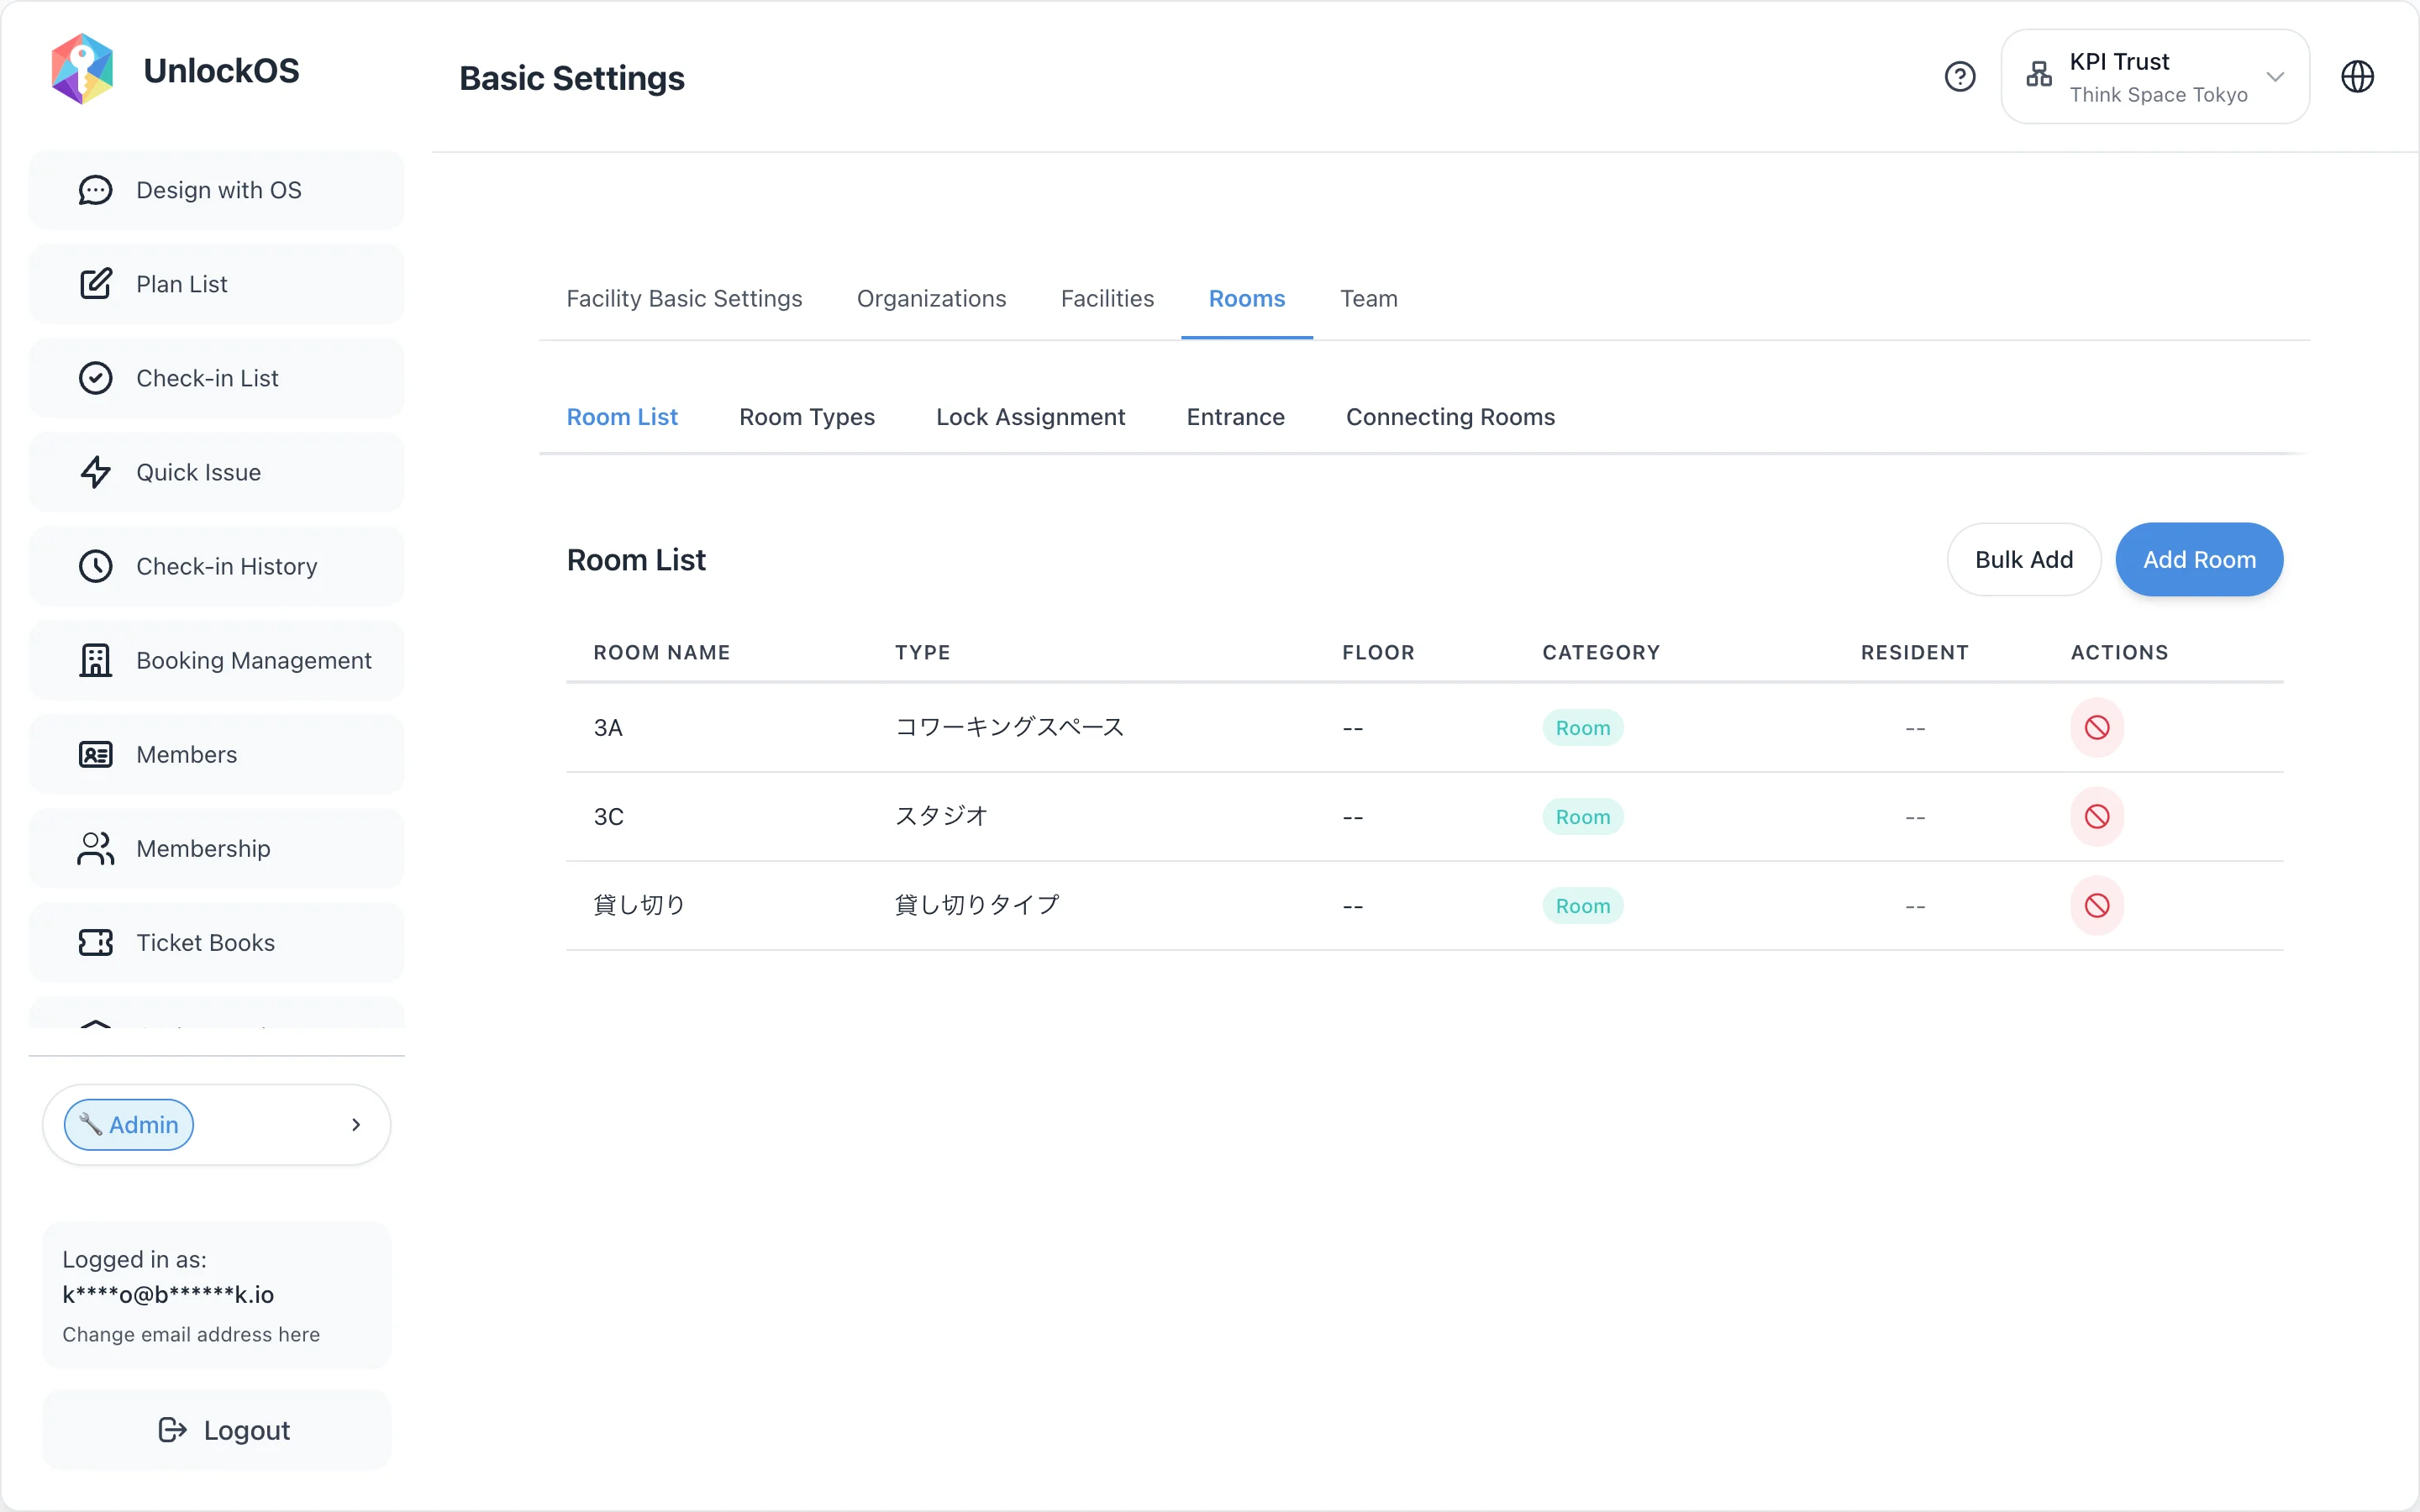
Verify
- All registered rooms appear in the Rooms list
- Each room shows the correct Room Type and category badge
If you want to sell adjacent rooms as one unit: Create the individual rooms first, then create a "Connecting Room" in the Connecting Rooms sub-tab. See Connecting Rooms help for details.
3-4. Assign locks to rooms
Purpose
Bind the smart locks registered on the KEYVOX side to rooms in UnlockOS. This is how the correct key is issued at check-in.
Prerequisites
- Step 1 (KEYVOX integration) complete
- Step 3-3: rooms registered
Steps
- Base Settings → Rooms tab → Lock Assignment sub-tab
- The rooms table appears
- From each row's Lock dropdown, choose the matching KEYVOX lock (place + door)
- The badge changes to Assigned the moment you select (no explicit Save button needed)
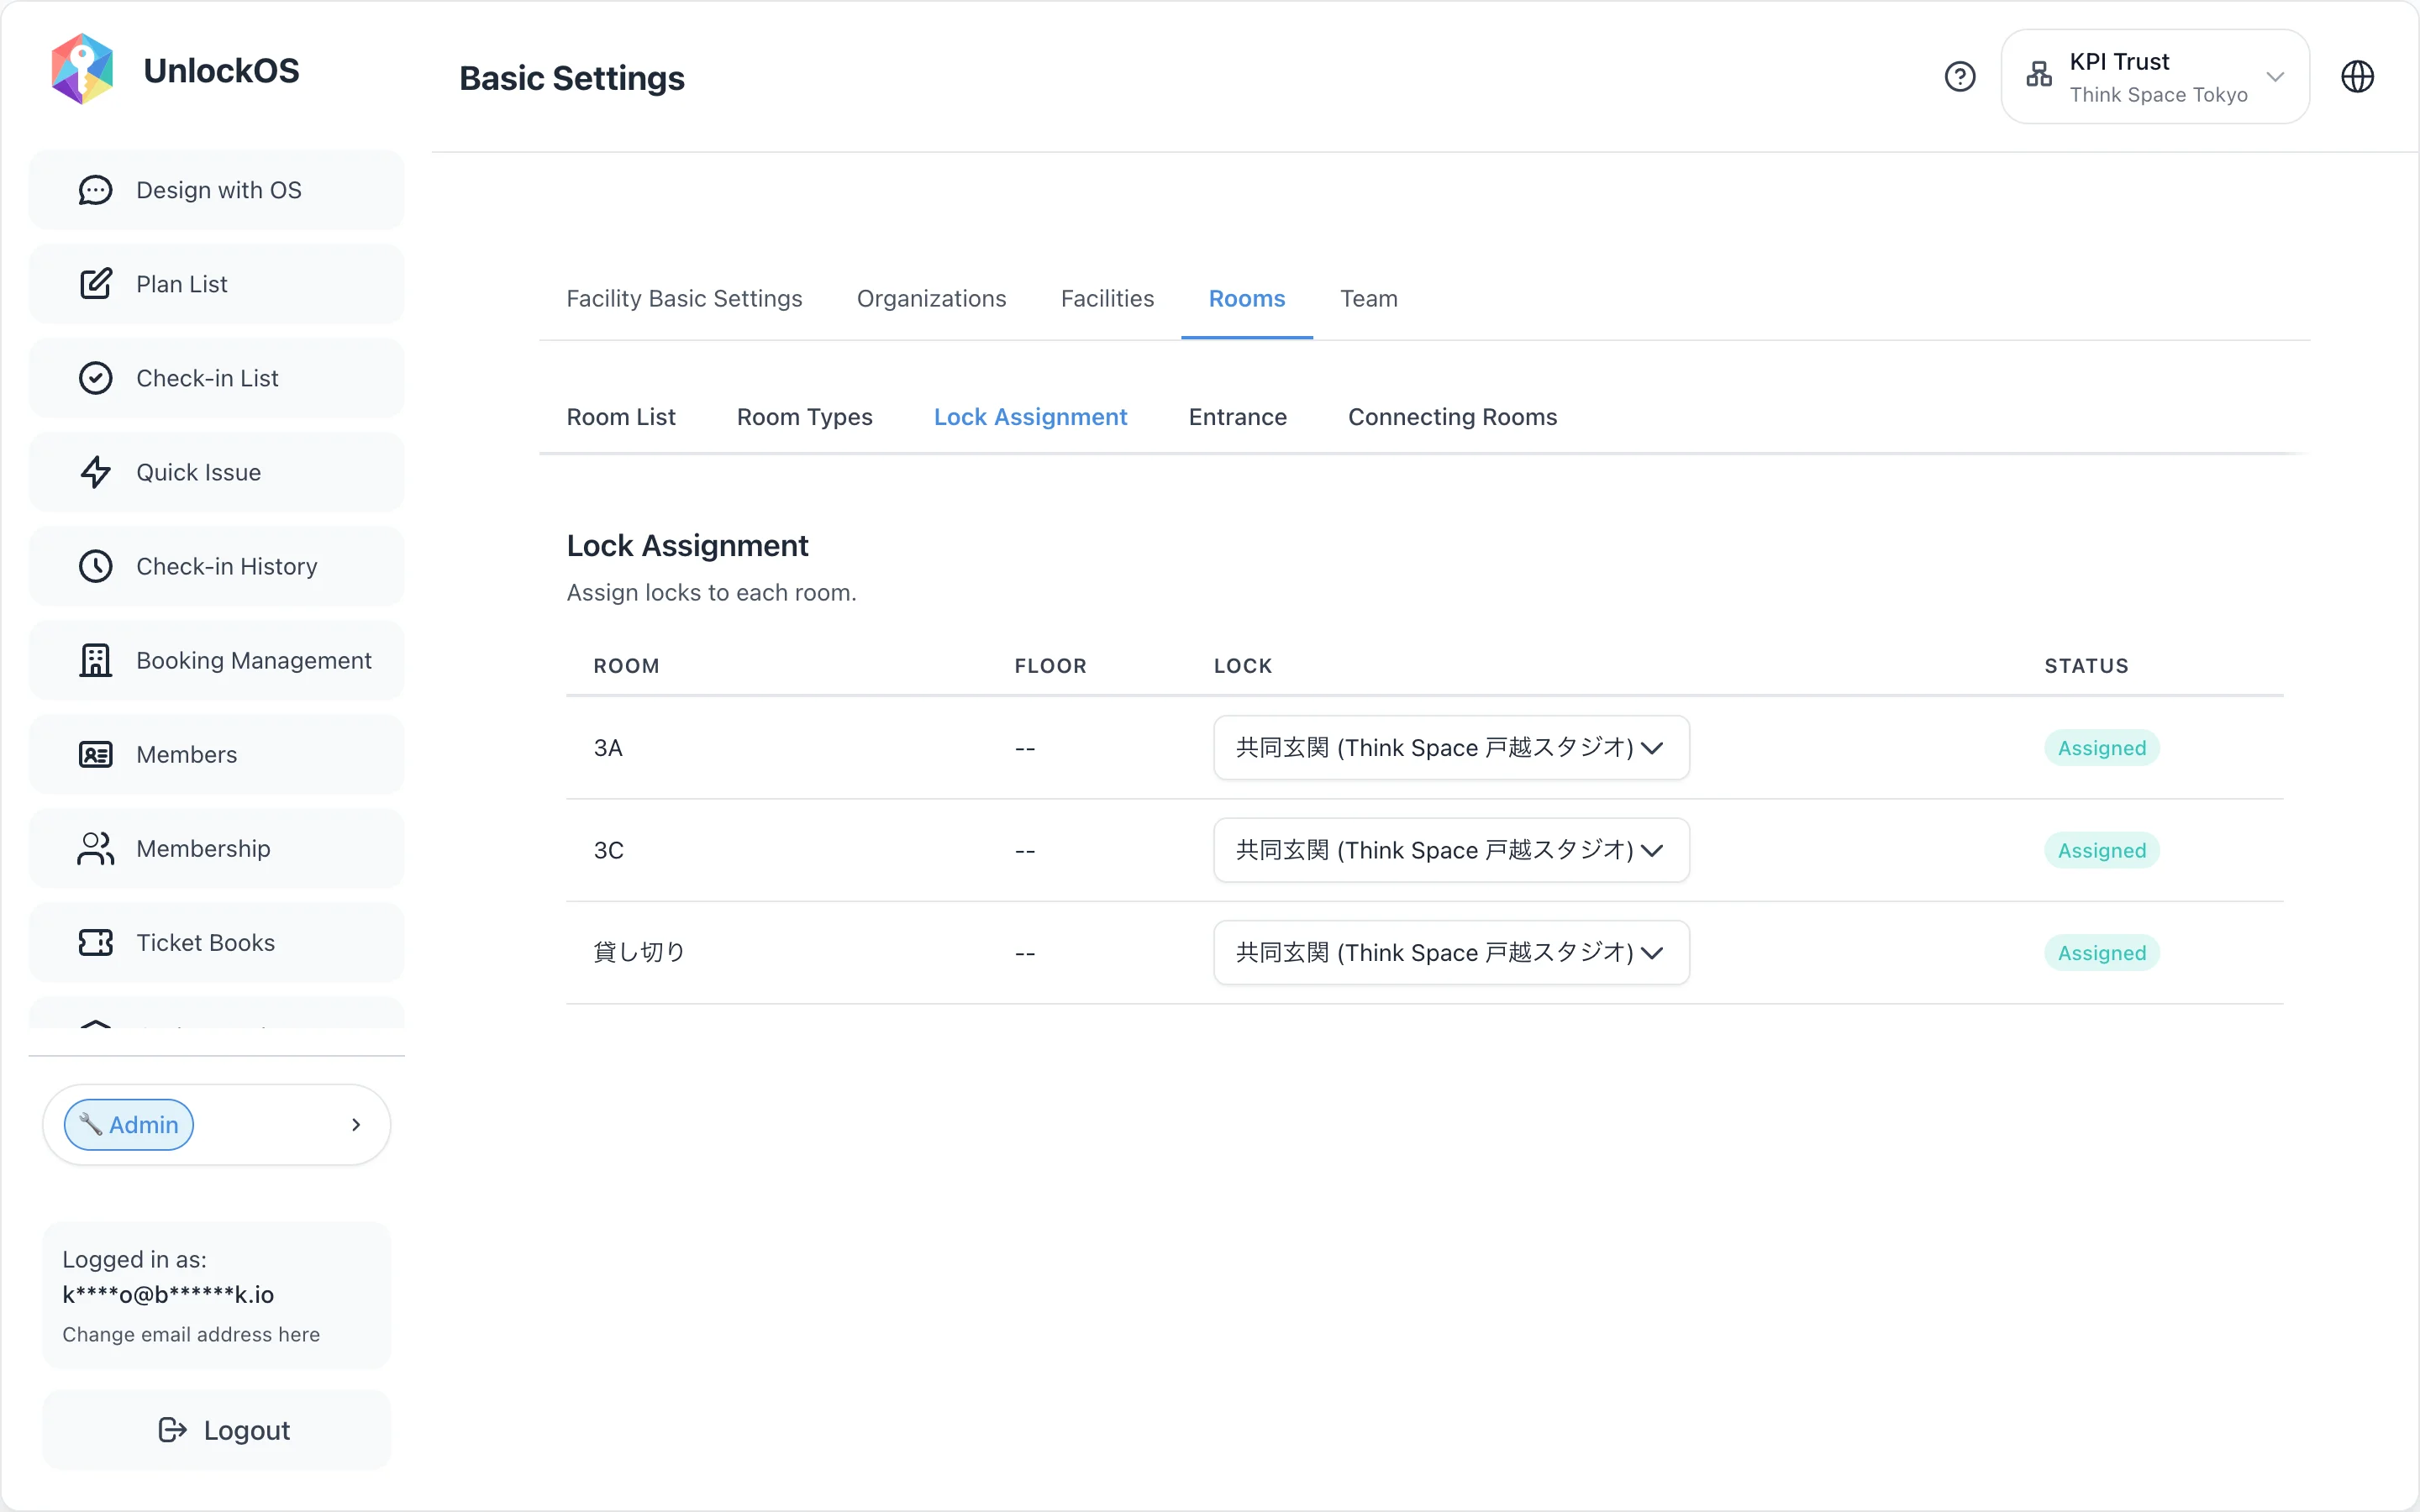
Verify
- Every room shows the "Assigned" status (green badge)
If the lock doesn't appear in the dropdown: The KEYVOX integration may have been disconnected. Go back to step 1 and confirm it says "Connected."
Details: Lock Connection help
Step 4: Create Plans (Hourly / TimeSlot / Accommodation / Flat+Overtime)
Purpose
Create pricing plans to sell to guests. Booking supports four bookable plan types:
| Plan type | Best for | Example |
|---|---|---|
| Accommodation | Hotels, vacation rentals, guest houses | 1 night ¥12,000 |
| Hourly | Coworking, studios, meeting rooms | 1 hour ¥1,000 |
| TimeSlot | Spaces sold in fixed time blocks | 10:00–13:00 ¥3,000 |
| Flat + Overtime | Climbing gyms, golf sims, coworking | First 3 hours ¥1,100, then ¥150/hour |
The plan list also includes "Daily flat" and "One-time" types, but those are for in-facility billing only and cannot be sold through booking URLs. For Booking, create one of the four types above.
Prerequisites
- At least one Room Type created in step 3
- Stripe integration complete in step 2 (not needed if your plans are free)
Steps
- Plan List → Plans tab from the main app's left menu
- Click New in the top-right
- In the Plan Info section, enter:
- Plan name (e.g., "Weekday plan")
- Description (optional)
- Plan Type — choose Accommodation / Hourly / TimeSlot from the dropdown
- In the Plan Details section, enter available days, base rate, time-of-day rates, etc. (fields vary by type)
- In the Simulation panel on the right, check the price the guest will see in real time
- Save
About day-specific and holiday rates: Accommodation plans let you set a per-night rate on each of the Weekday / Friday / Saturday / Sunday / Holiday / Day Before Holiday tabs, and those rates now apply per night to bookings made through the booking URL (priority: Holiday > Day Before Holiday > Friday > Saturday > Sunday > Weekday). Holidays are detected automatically from the facility's country.
Note that leaving an unused day tab disabled causes nights of that day type to be billed as 0 — they do not fall back to the weekday rate. See Price Plan Settings — How Day-of-Week and Holiday Rates Are Chosen.
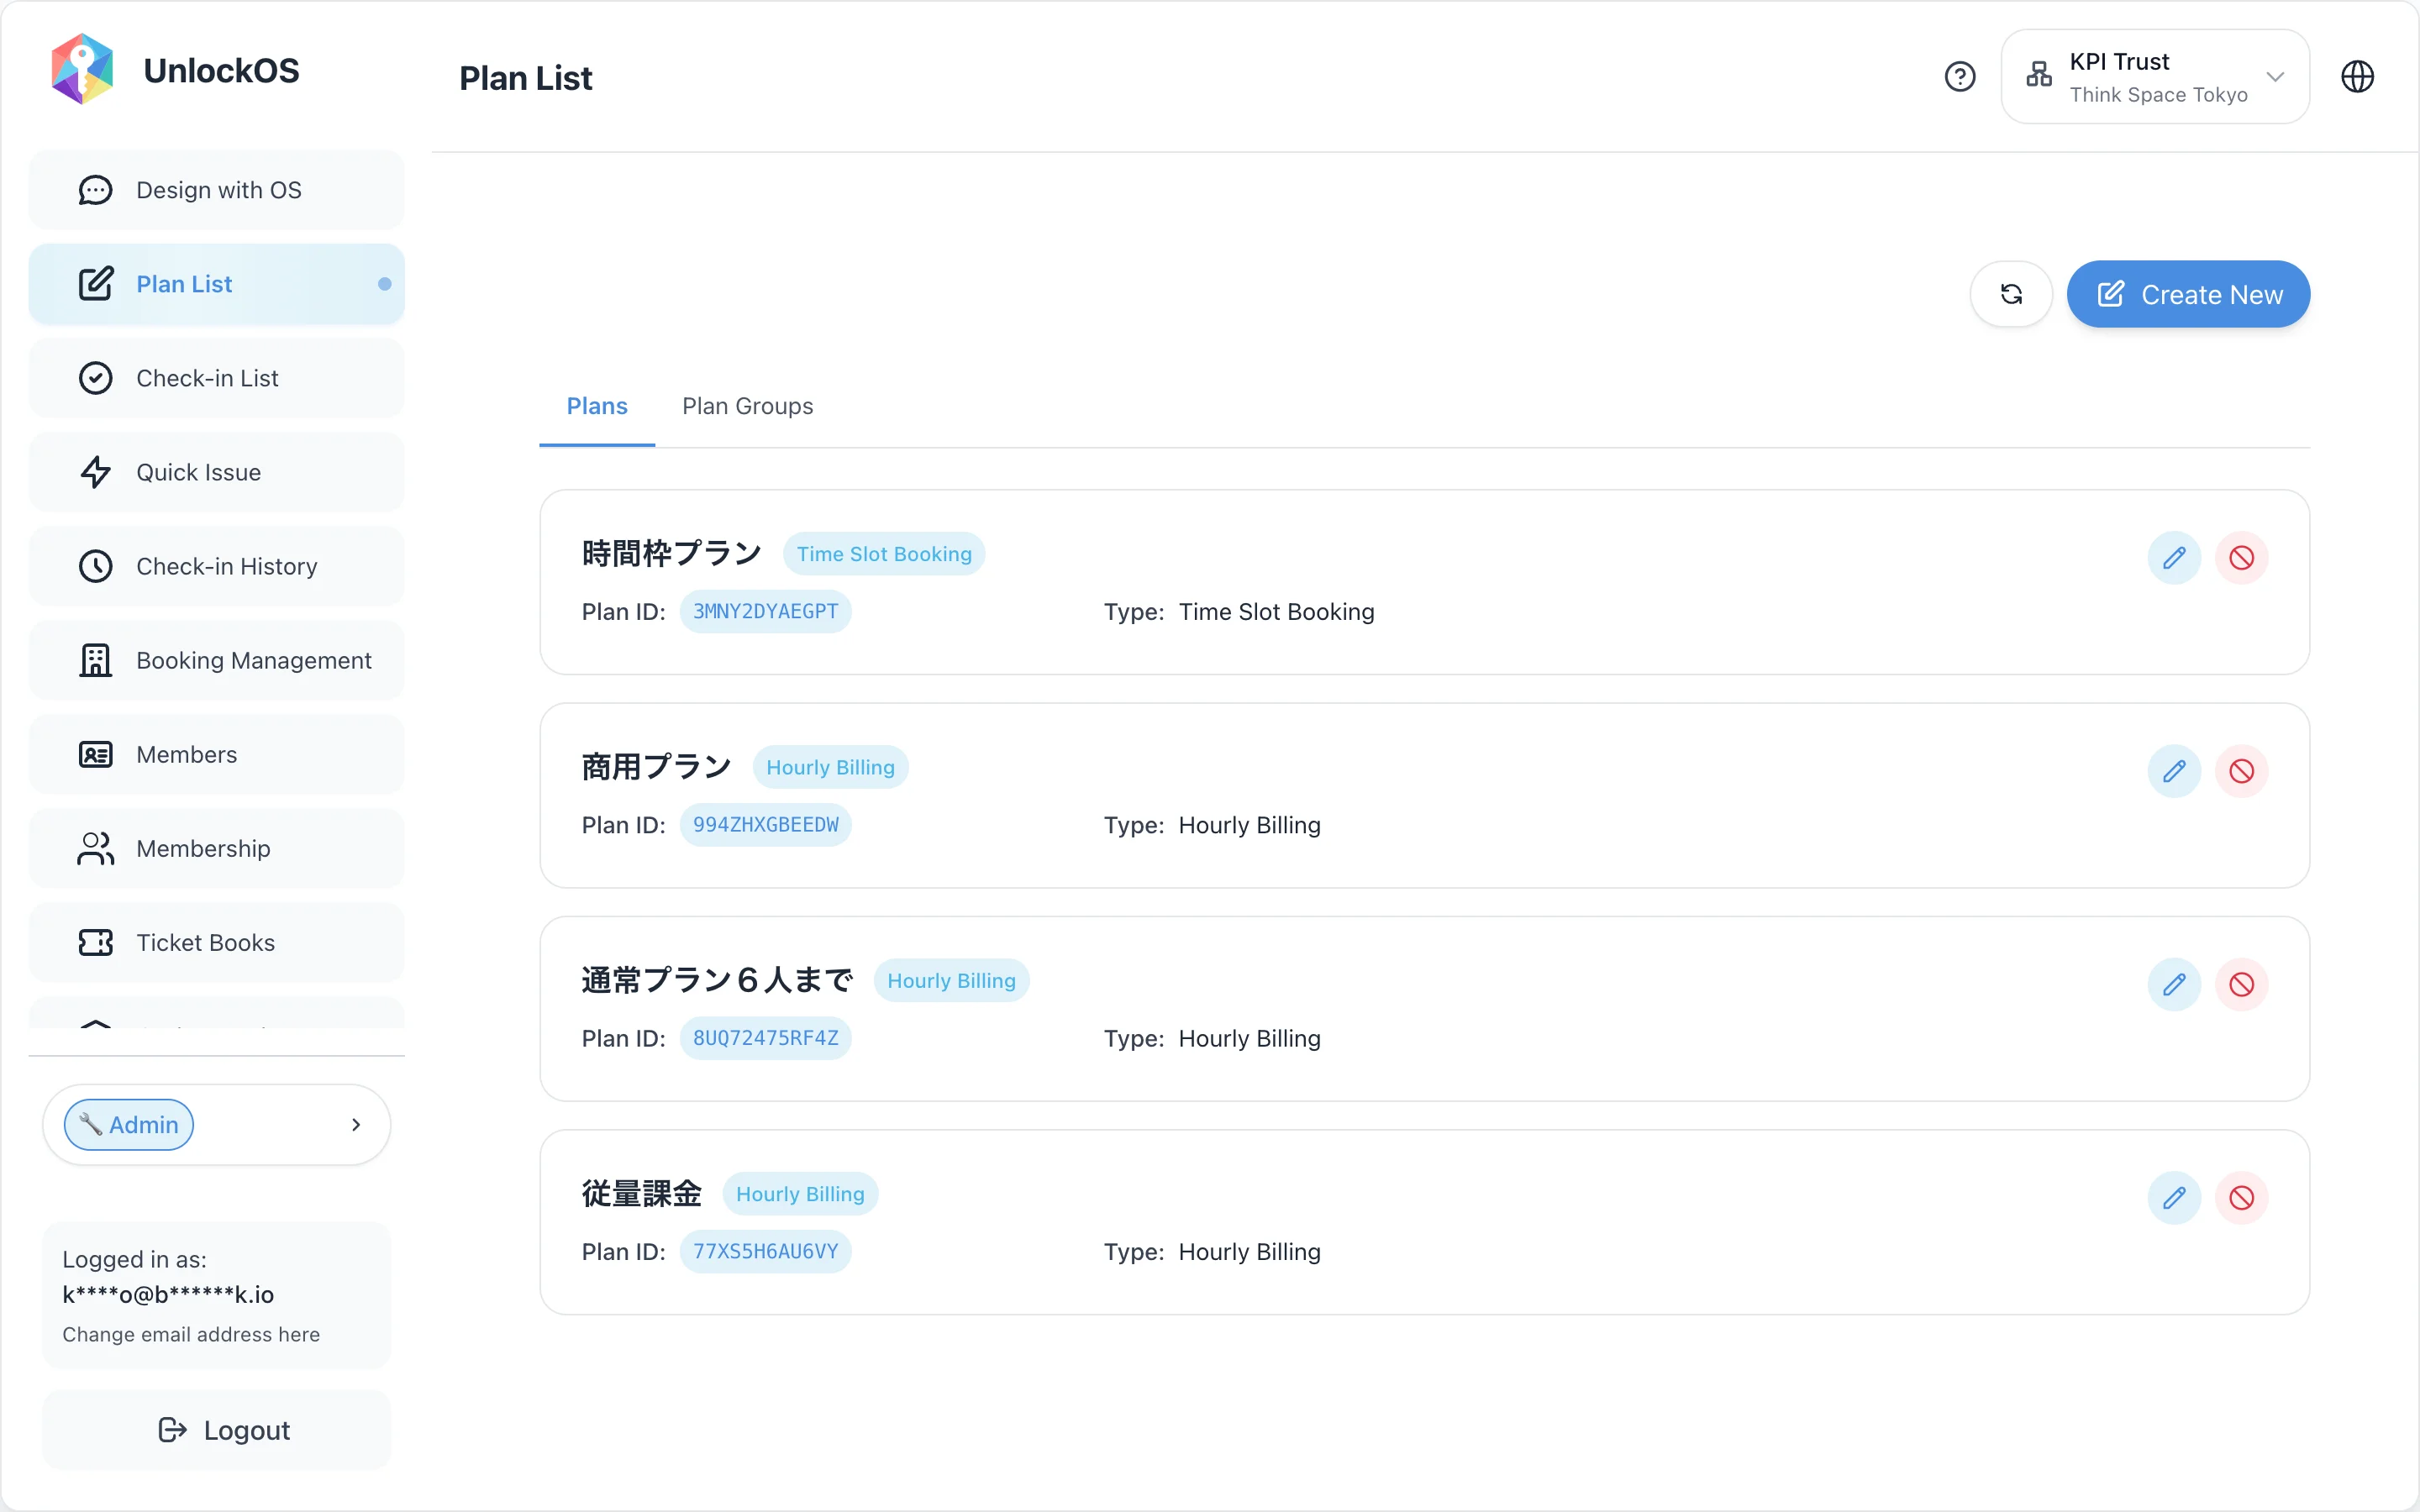
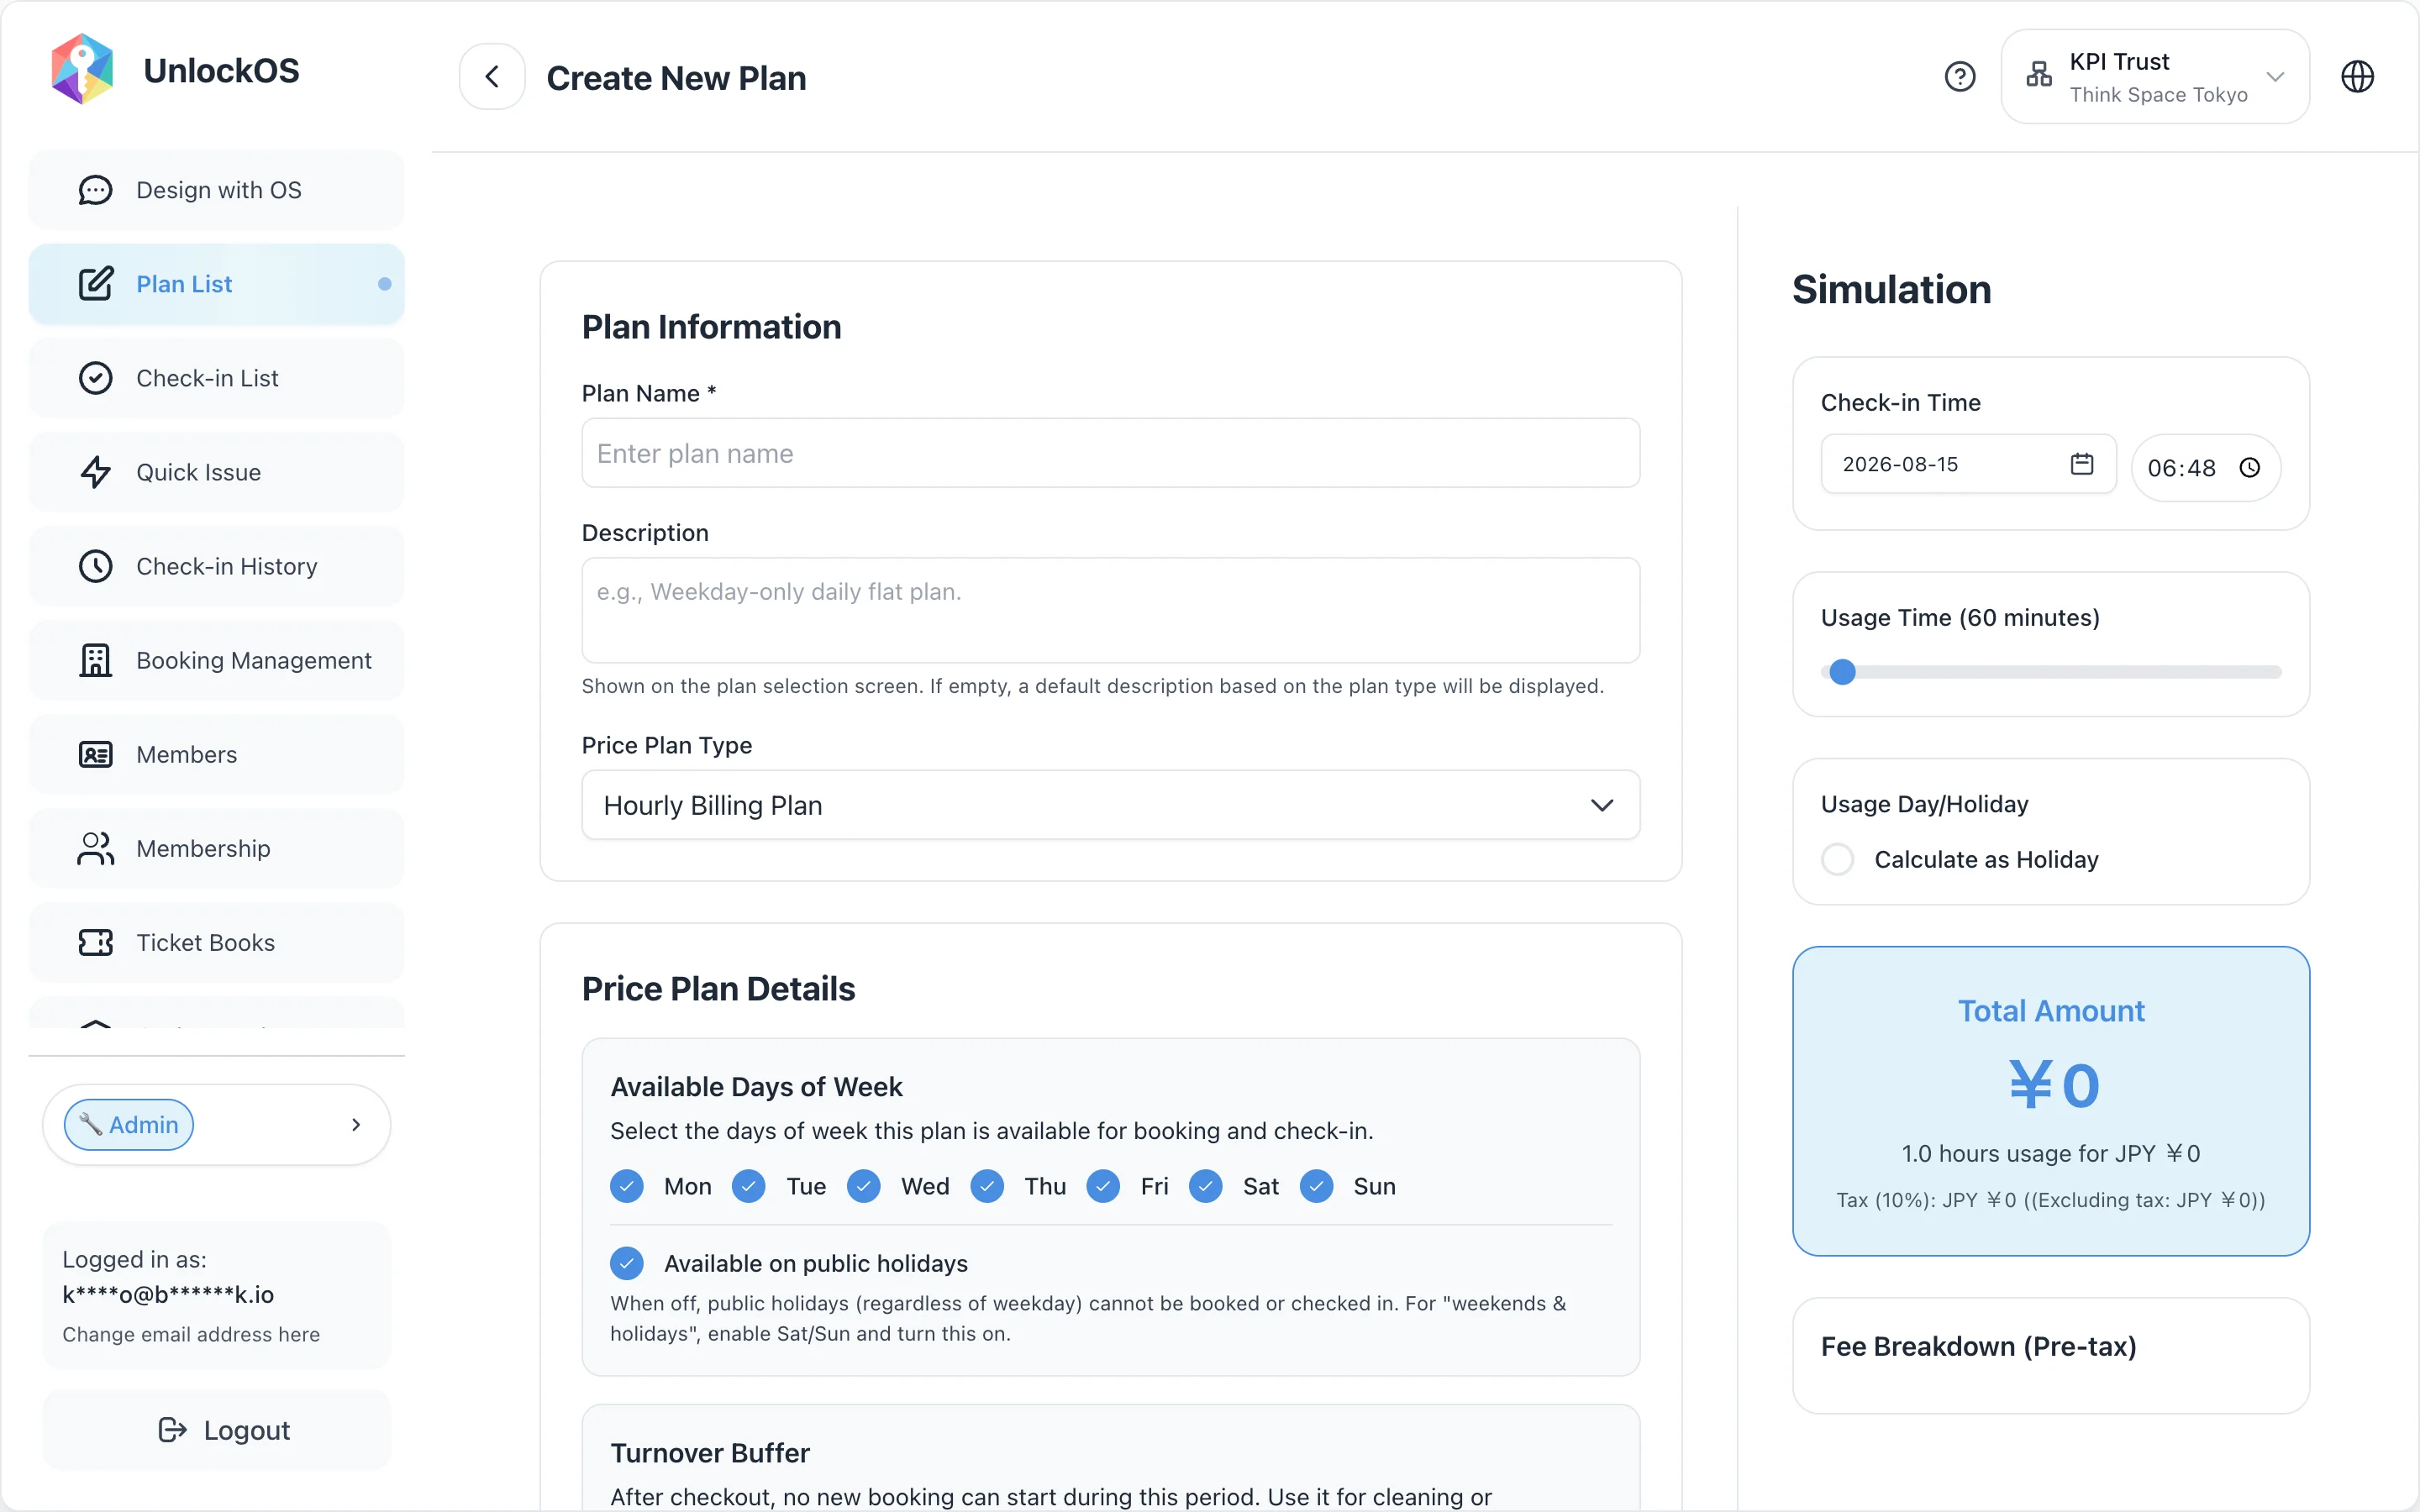
Verify
- The plan appears in the Plan List
- The type badge (Hourly / Accommodation / TimeSlot) matches your intent
- Re-open via the edit icon and confirm the simulation result is correct
Details
- Plan List help — Plan list operations
- Plan Form help — Field details per type
- Week-grid booking (Hourly / TimeSlot behavior)
- TimeSlot booking setup
Design tip: Start with one Room Type × one Plan and grow from there. You can refine the combinations later — multiple plans across multiple room types is supported but doesn't need to be the starting point.
Step 5: Booking > Plan Config (mapping Room Types × Plans)
Purpose
Link the plans from step 4 with the Room Types from step 3 to assemble the bookable product guests actually see. Without this mapping, no rooms or plans will appear on the booking URL.
Prerequisites
- Step 3 (Room Types) and step 4 (Plans) complete
Steps
- Open Booking from the main app's left menu
- Select the Plan Config tab
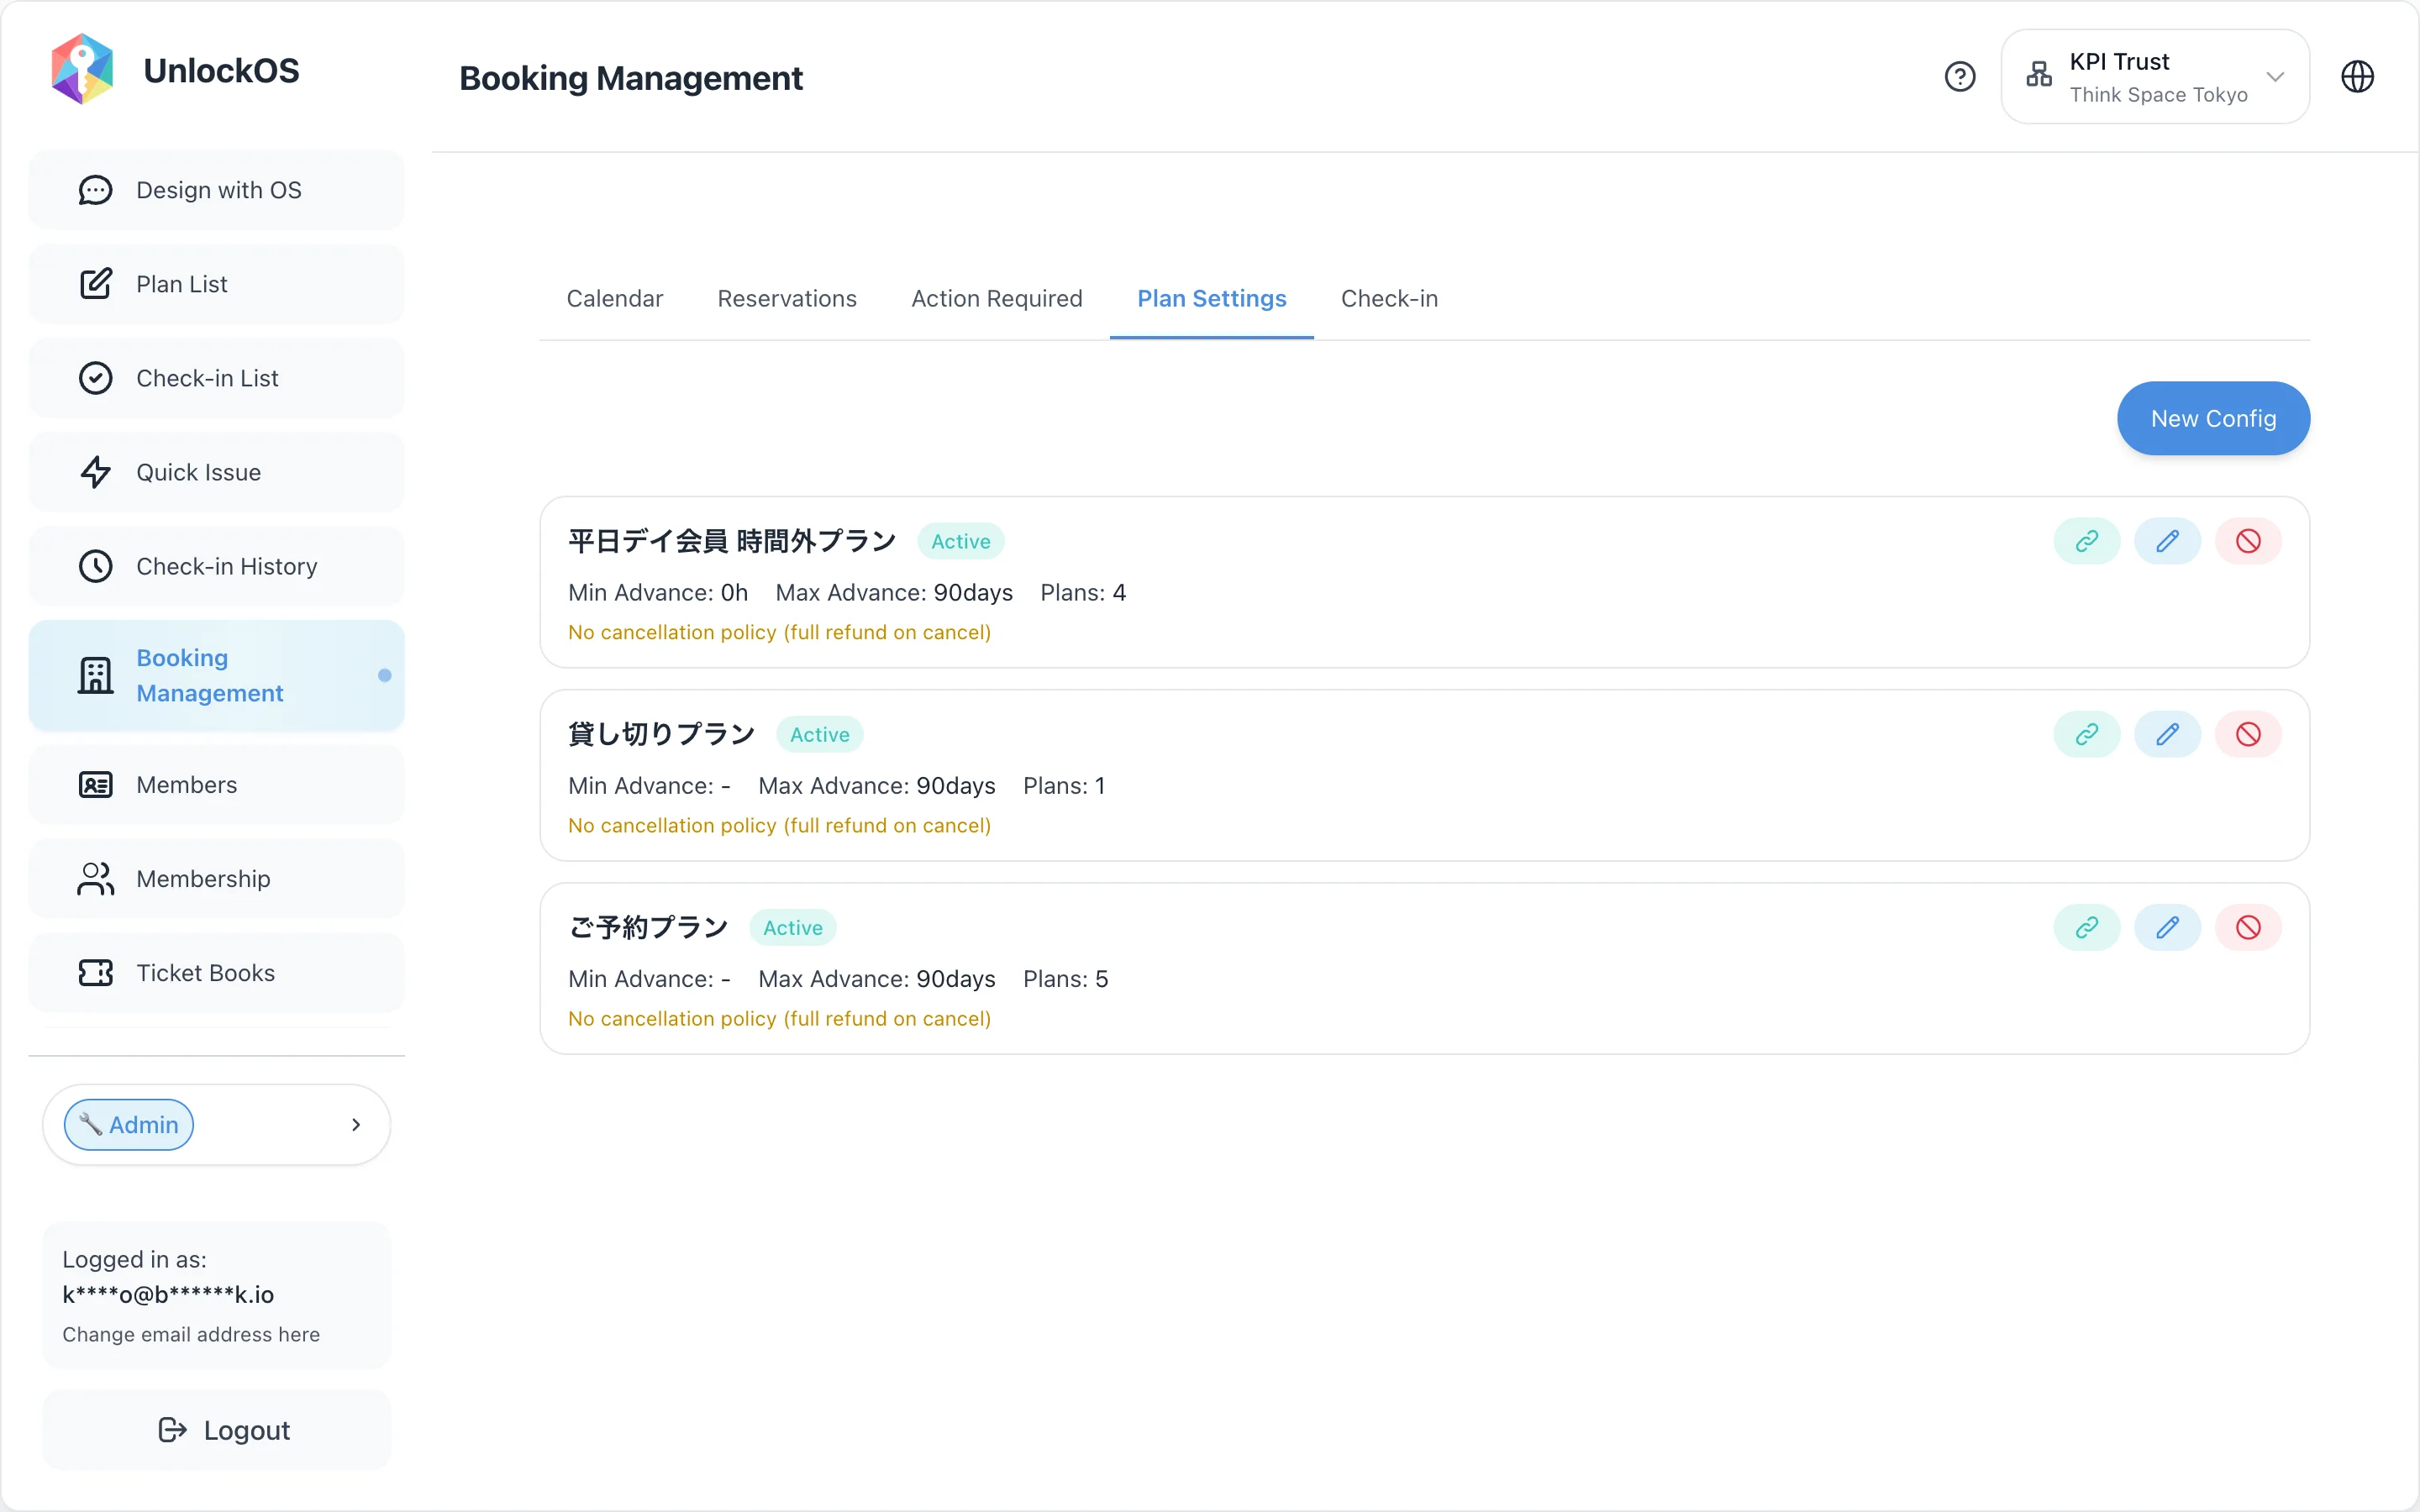
- Click New (edit existing configs via the pencil icon)
- Enter a config name (e.g., "Direct from website," "ThinkSpace 3C")
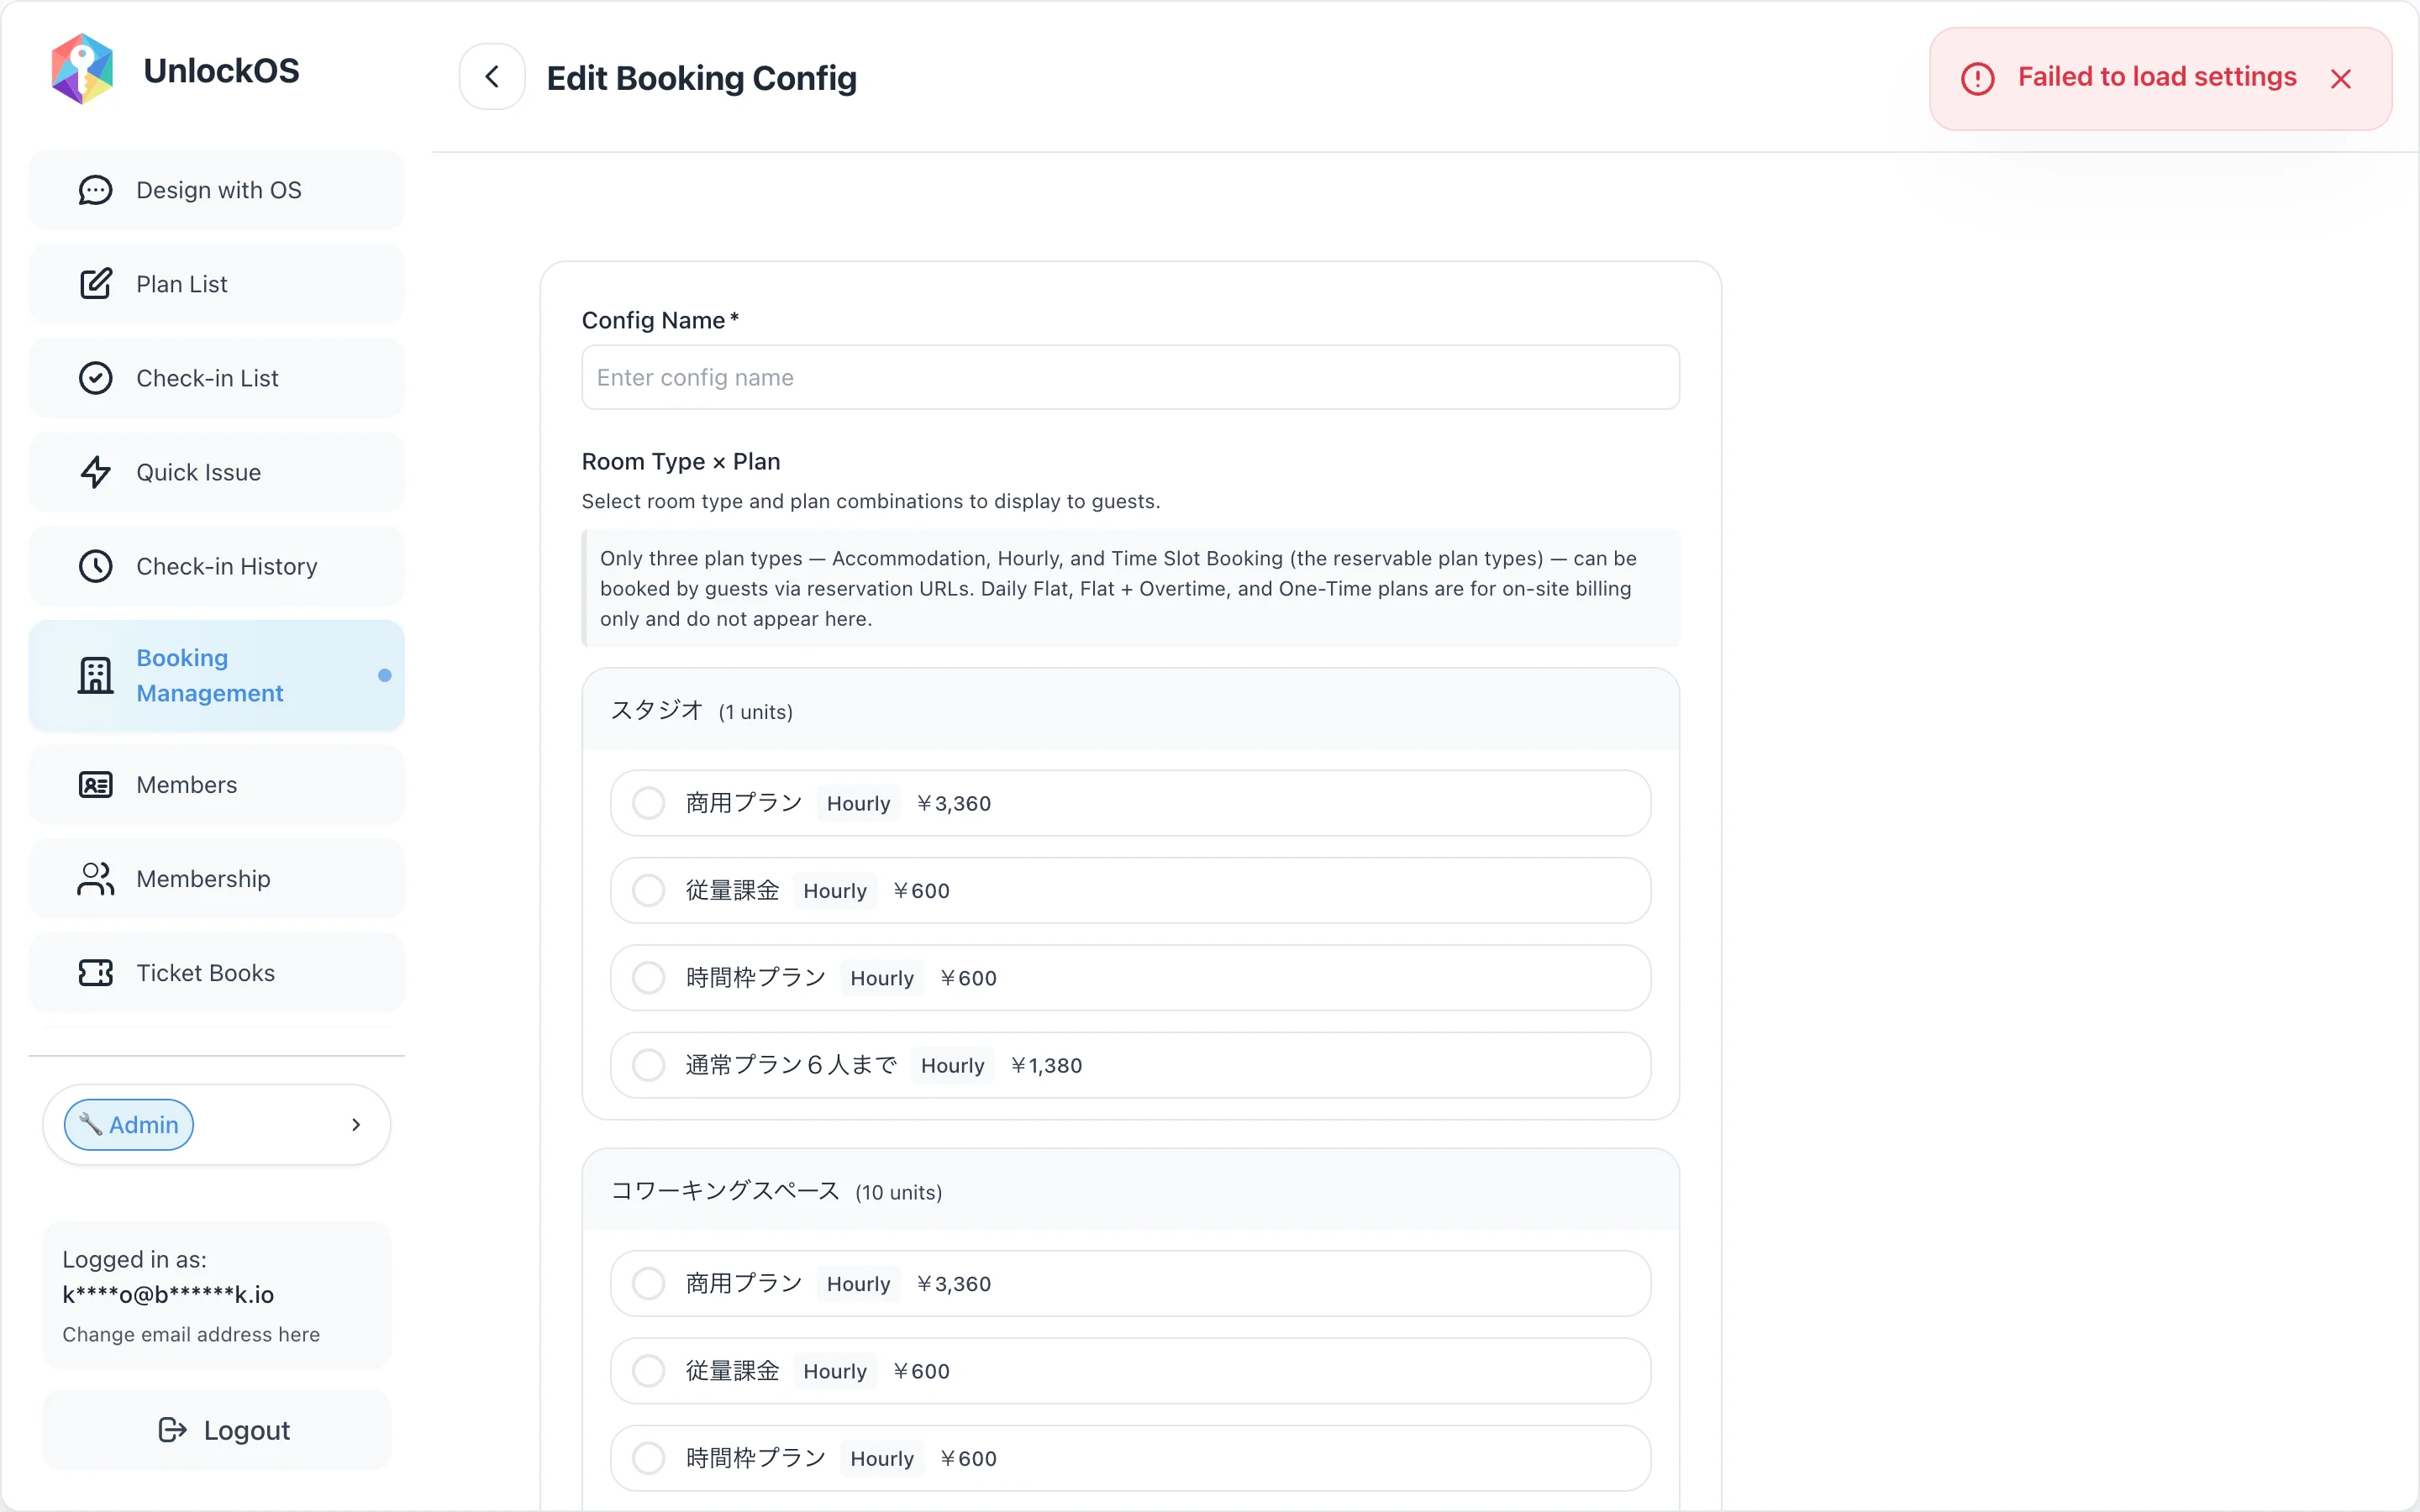
- In the Room Type × Plan section, choose the Room Types you want to sell, and check the plans to attach
- For each plan, set display name, description, capacity, and key display type (QR / PIN / facial recognition)
- Set currency, advance booking lead time, max advance days, and cancellation policy
- Save
- Click the link icon on the config card to copy the booking URL
Verify
- The config card shows an "Active" badge plus min booking time / max advance days / plan count / cancellation policy summary
- The booking URL is in the format
https://booking.unlockos.io/{slug}?config=<config_id> - Opening the URL in a browser shows the booking screen
"Supported plan types" caveat: As the yellow banner at the top of the edit screen explains, only Accommodation / Hourly / TimeSlot / Flat + Overtime can be sold via booking URLs. "Daily flat" and "One-time" plans won't appear here. If a plan is missing from the list, check its type.
Details
Multiple sales channels: Create multiple configs and combine plans/prices differently per URL — "website channel," "newsletter channel," "corporate channel," etc.
Making a second, similar configuration: Click the duplicate icon (left of the pencil) on a configuration card. The room-type × plan mappings, display names, descriptions and the images you already uploaded are all copied, and the duplicate opens in the editor. This is what you want when a member-facing configuration differs only in the max advance days — no re-uploading images. The copy is named "{original name} (copy)", so rename it before saving.
Images point at the same files as the original (duplicating costs no extra storage). Removing an image from one configuration leaves the other configuration's image intact.
After you remove an image: it disappears from the list and from the booking page immediately. The stored file itself is deleted automatically 30 days after no configuration references it any more (a weekly cleanup job). Within that window you can put the same image back. If something must be taken down right away — a photo with personal information, say — contact your operations lead.
Step 6: Google Calendar integration (optional)
Purpose
Auto-write UnlockOS reservations to Google Calendar. This prevents double-bookings against other channels (Airbnb, manually maintained calendars, etc.).
Facilities that operate on a single channel can skip this step.
Prerequisites
- Step 5 complete; reservations can be received
- A target Google account
Steps
- App Integrations → External tab from the main app's left menu
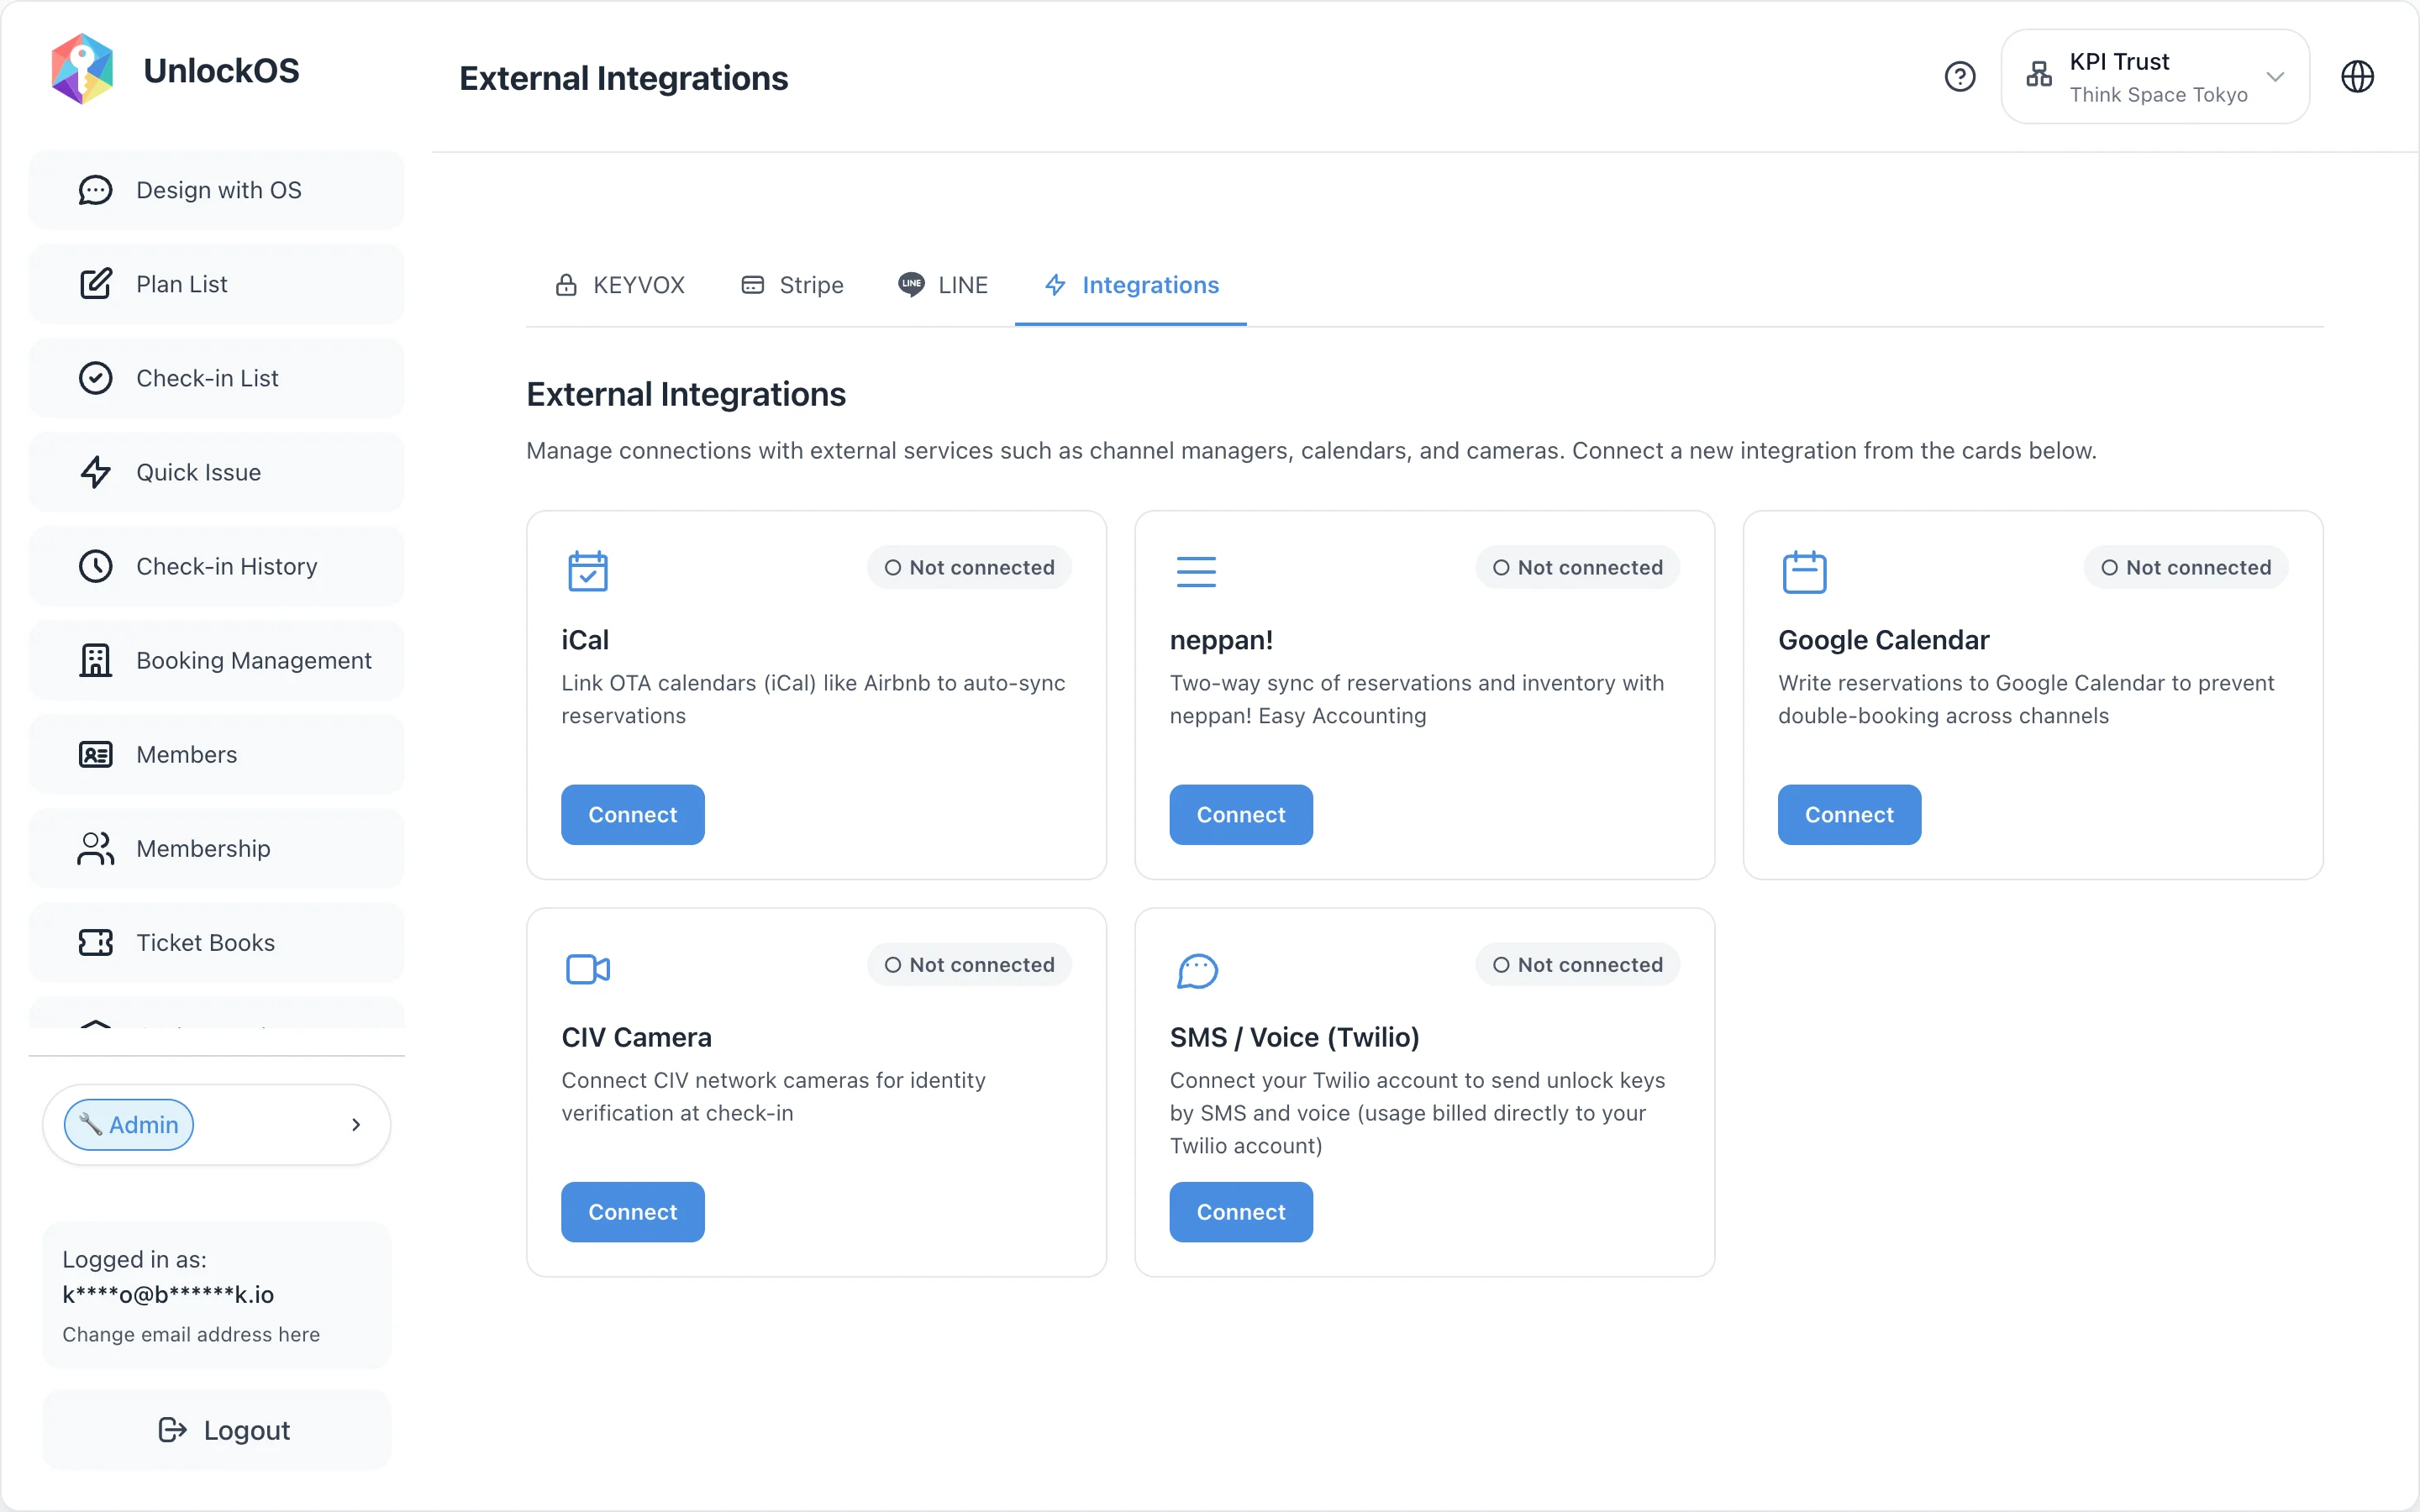
- Click the Google Calendar card
- Click Connect to start the Google OAuth flow
- Choose the calendar to write to
- Save
Verify
- The External tab's Google Calendar card badge becomes "✓ Connected"
- A test booking creates the event in the chosen Google Calendar
If the Google Calendar card doesn't appear: The facility's
card_gcalfeature flag is OFF. Ask support to enable it. In the screenshot from Think Space Tokyo the flag is OFF, so only Neppan! and CIV Camera show.
Details
iCal integrations (Airbnb / Rakuten Travel, etc.) are covered in step 9 (post-test production setup).
Step 7: Check-in Config (optional)
Purpose
Bundle pricing plan × smart lock × payment timing × capacity into one entity and create a check-in experience launched from a URL (e.g., a QR code at the front desk).
Facilities that complete everything via the booking URL alone can skip this step. You can always add it later.
Prerequisites
- Step 4 (Plans) complete
Steps
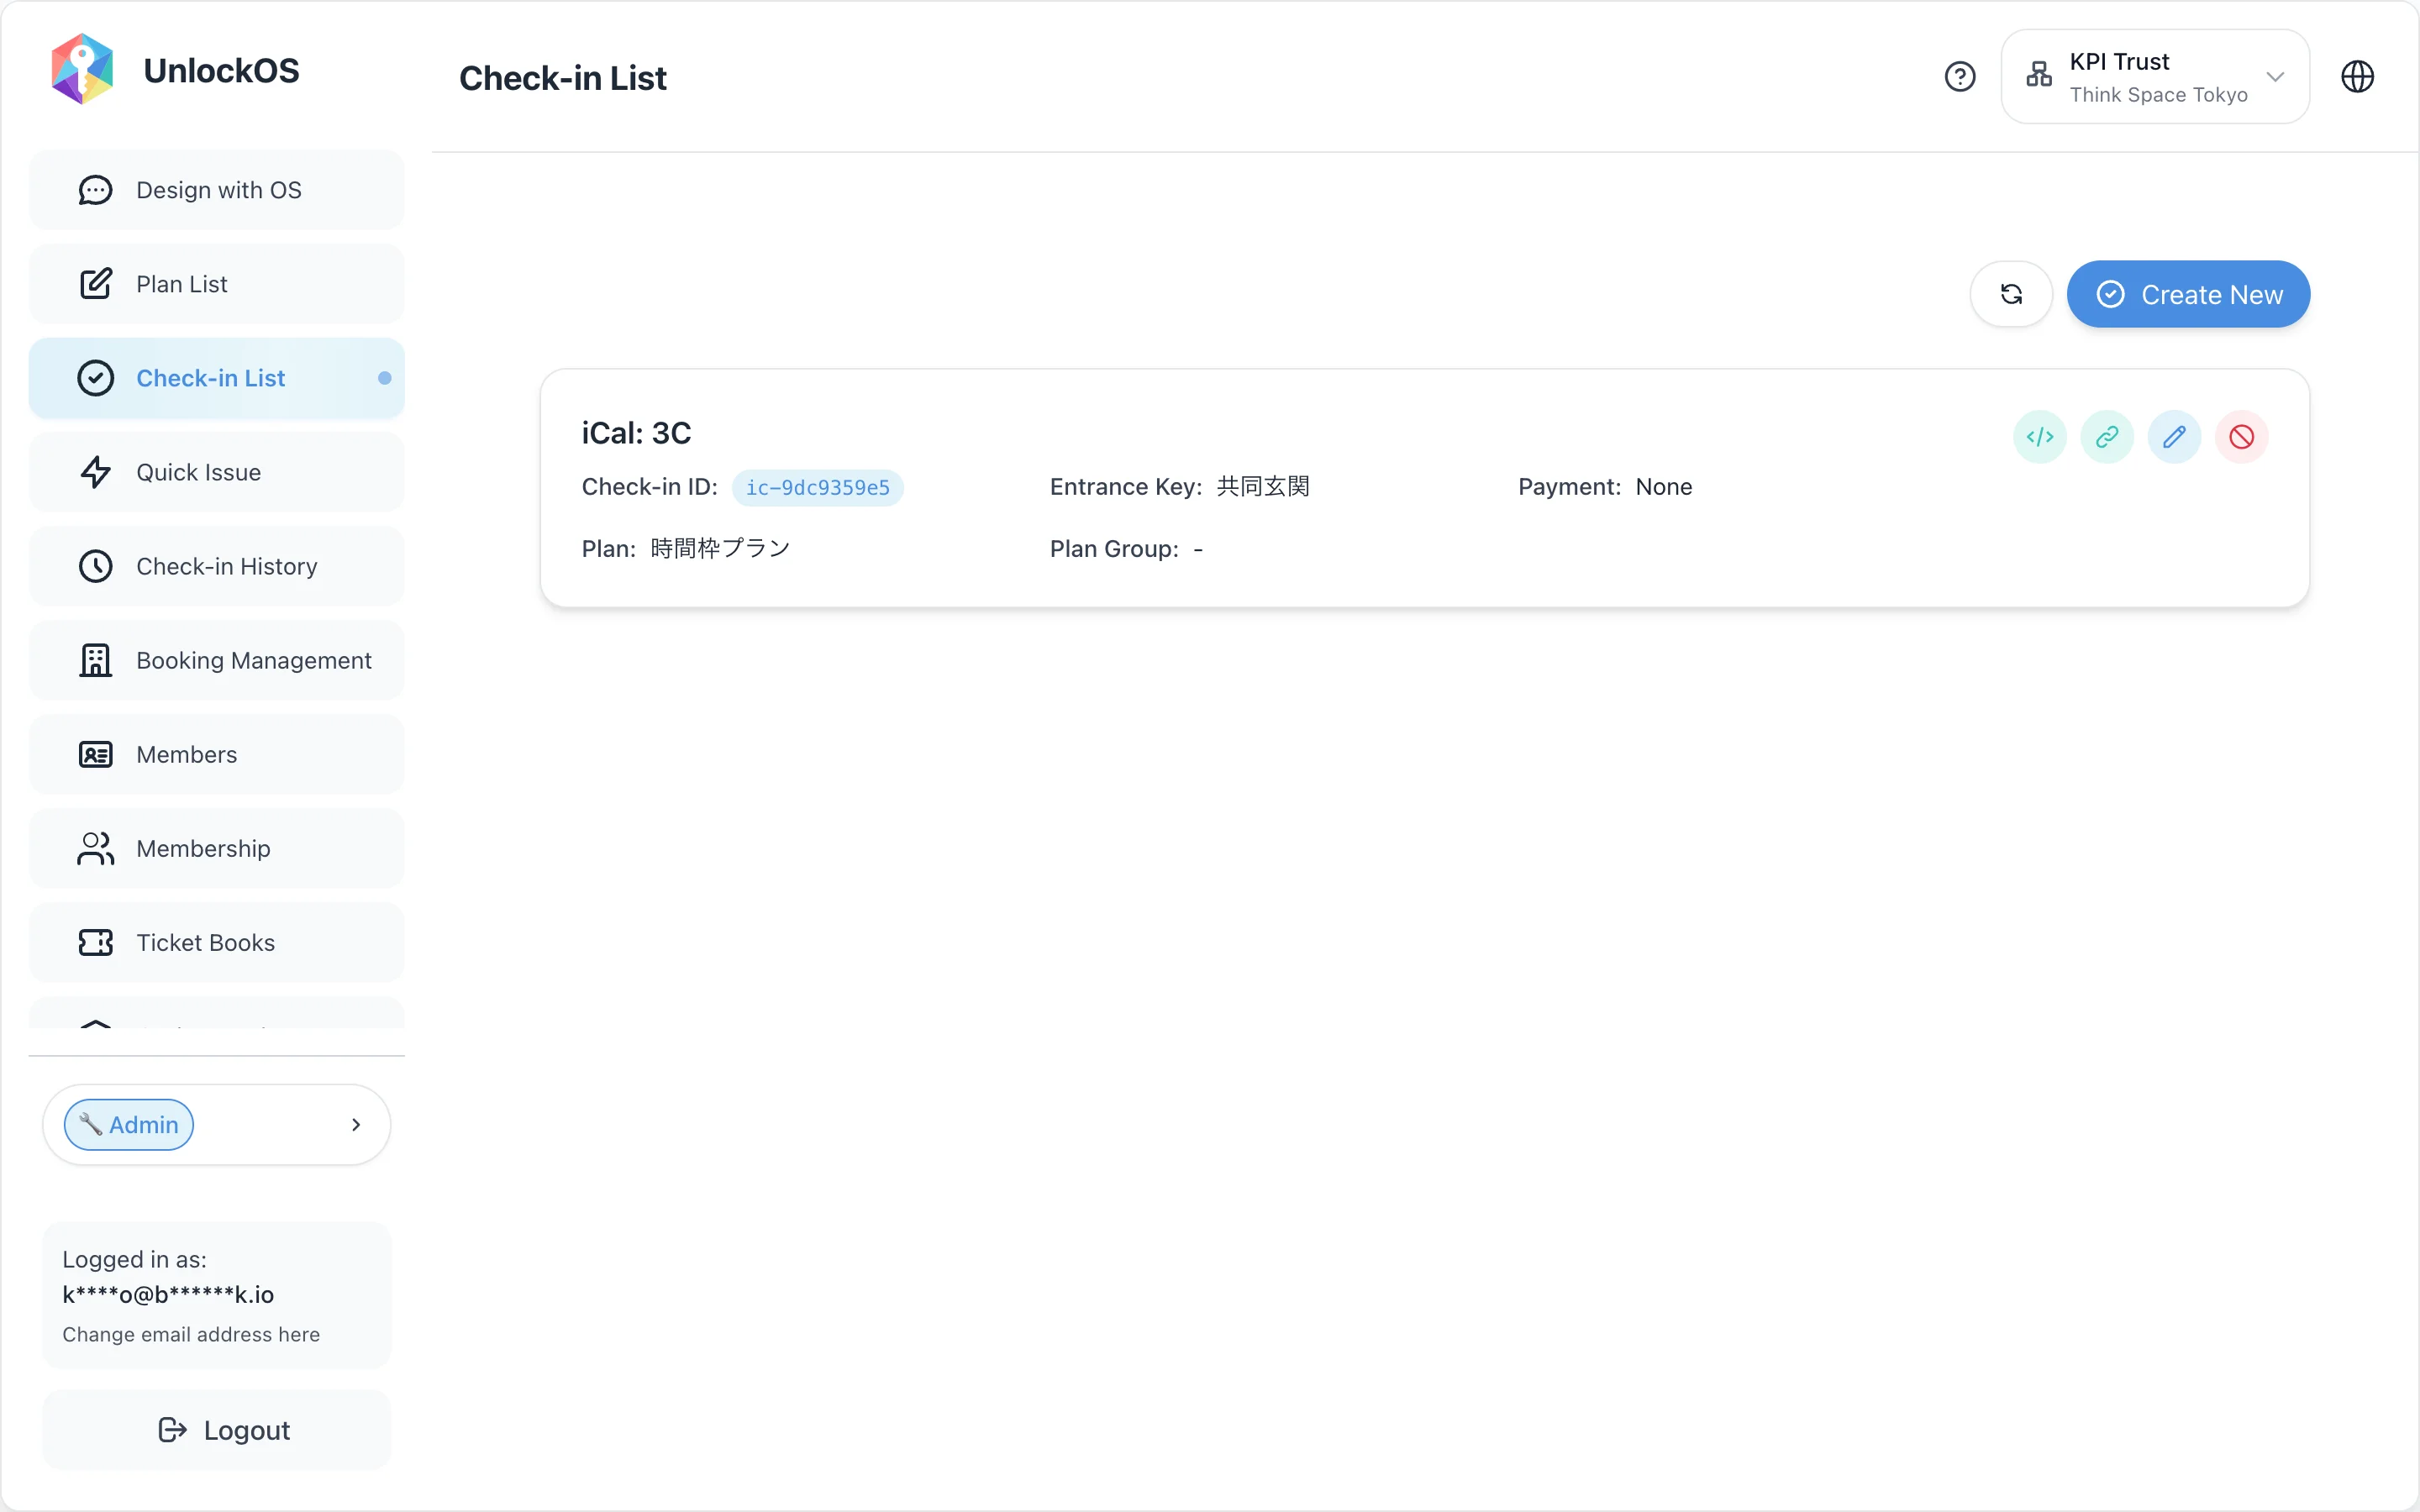
- Open Check-in List from the main app's left menu
- Click New in the top-right
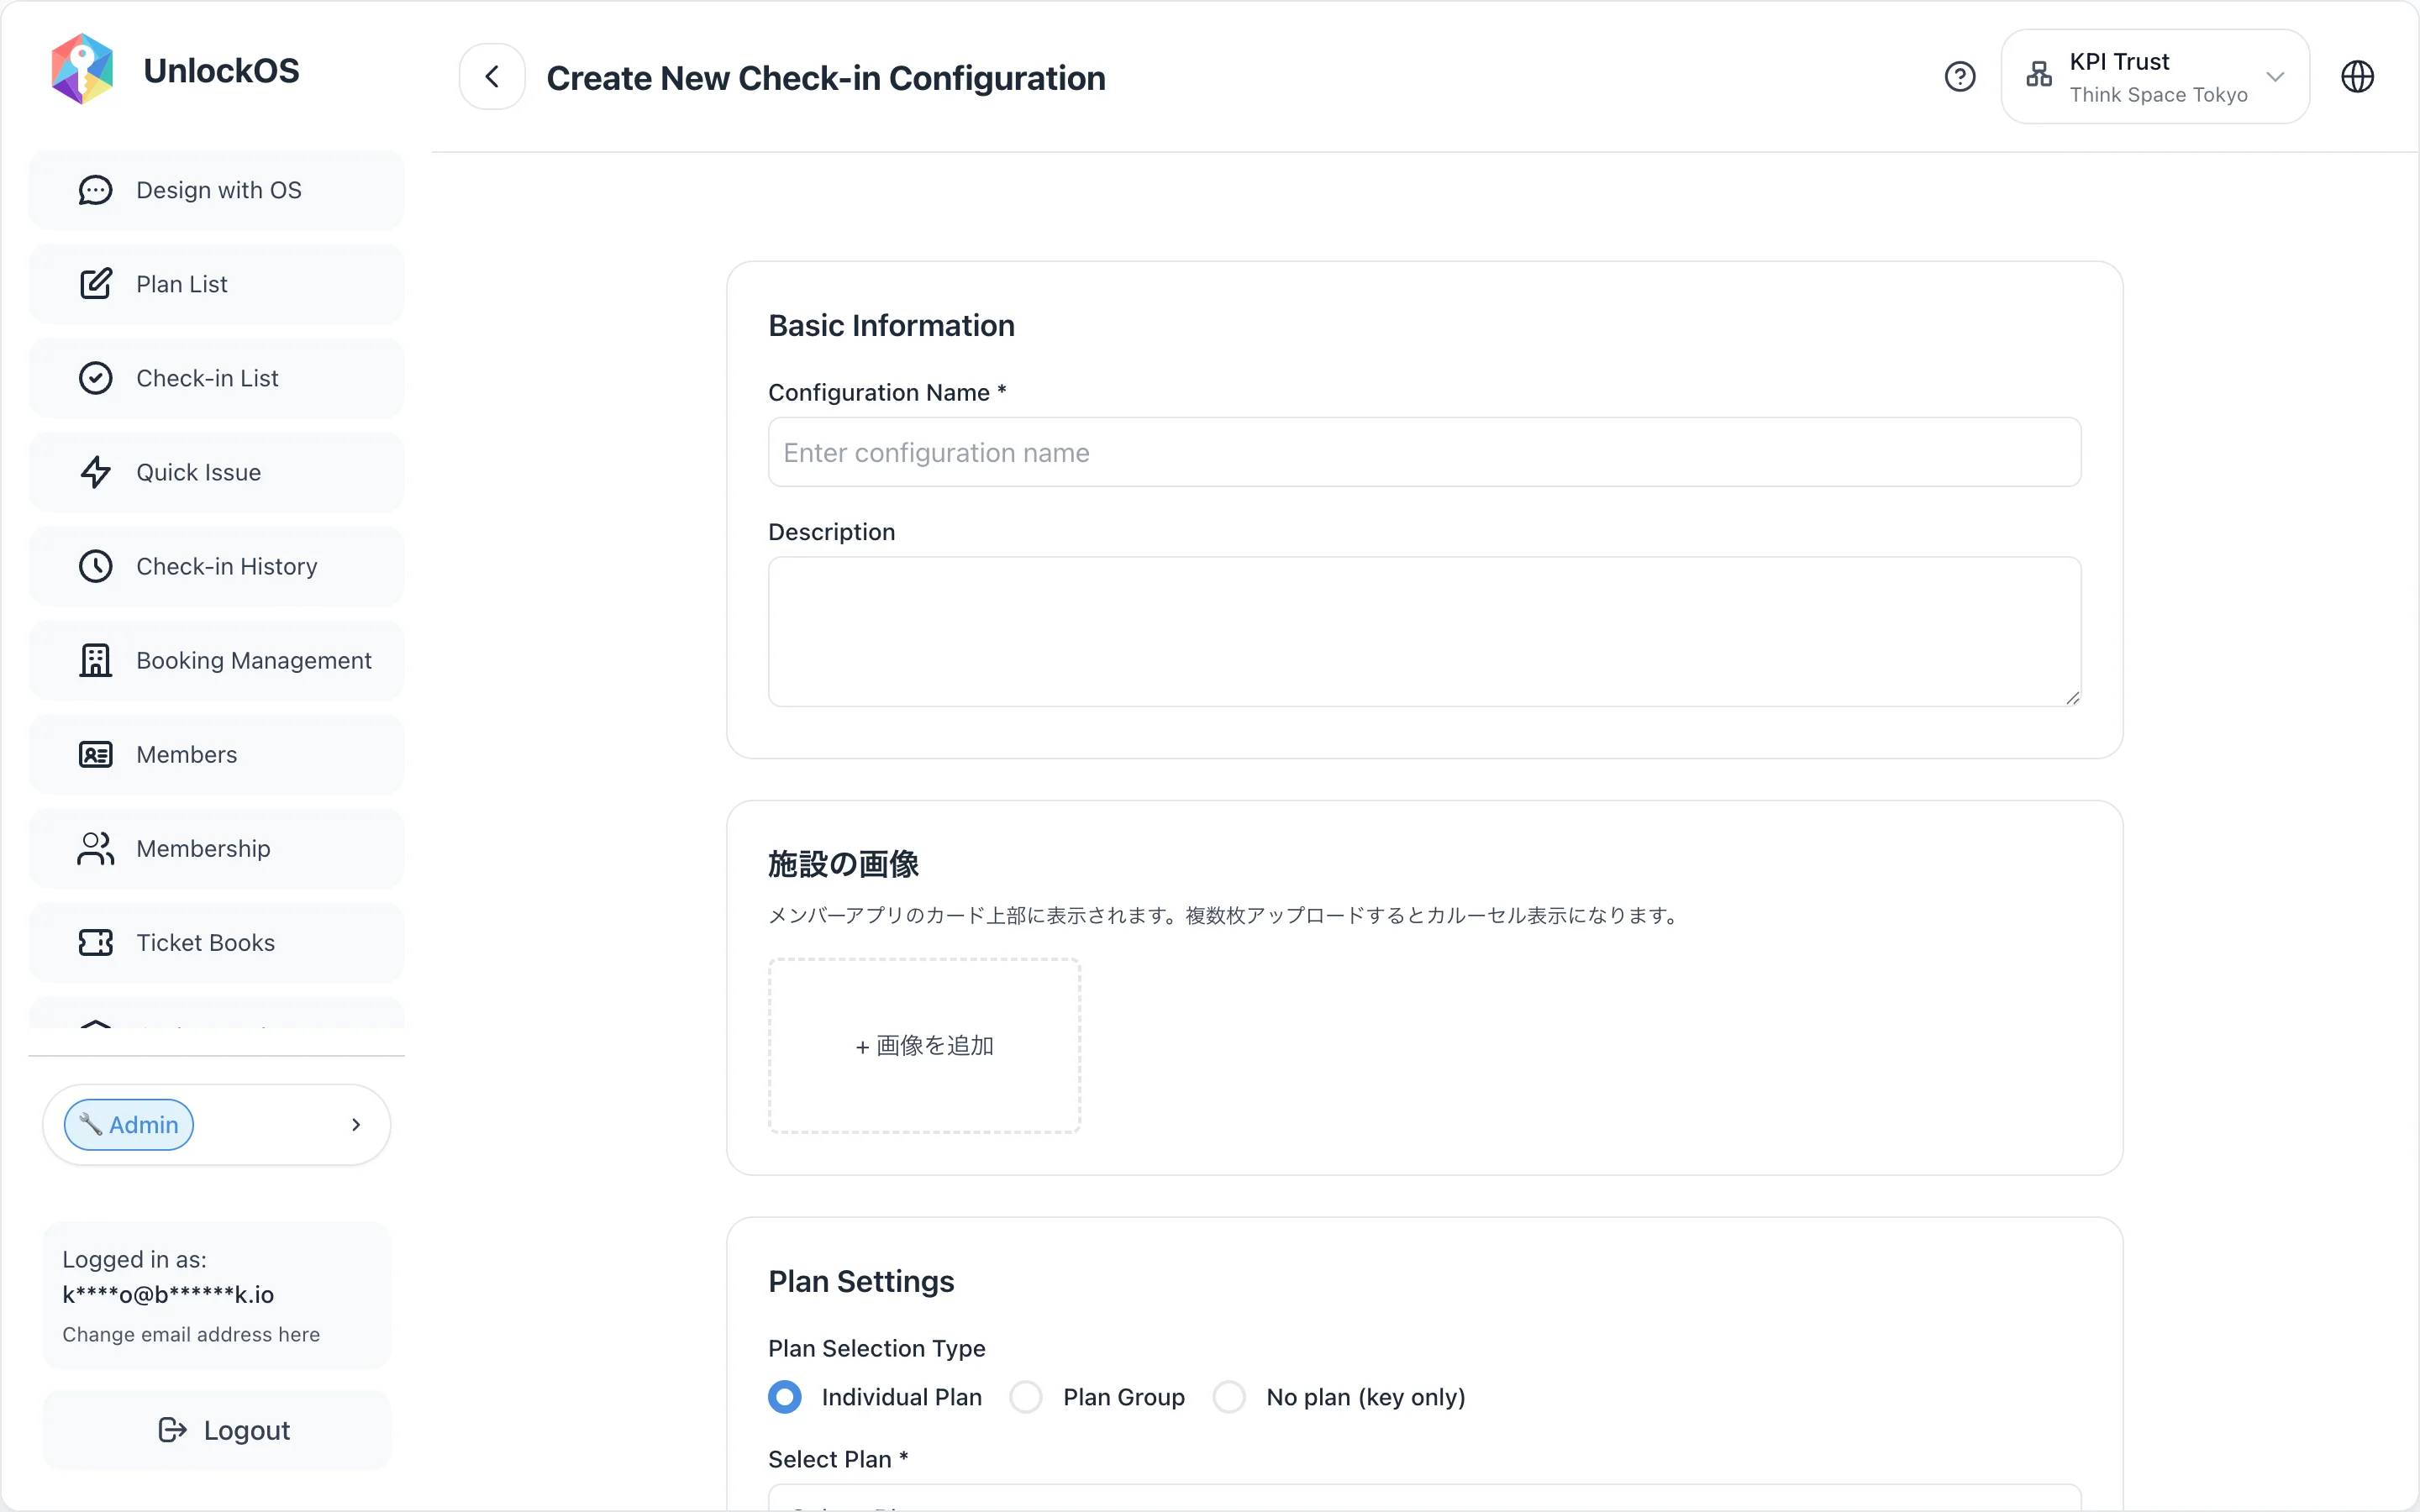
- Basic info: Enter check-in config name and description
- Facility images: Upload images shown at the top of the member-app card (optional, supports multi-image carousel)
- Plan: Choose Plan selection type (single plan / plan group), then pick the plan to apply
- Key settings: Set entry lock, capacity, payment timing, deposit
- Save
Verify
- The new config appears in the Check-in List with a check-in ID (
ic-xxxxxxxx) - Open the check-in URL copied from the link icon and run through the check-in flow
Details
Step 8: Form Config (optional)
Purpose
Define guest information input forms — passport image, signature, emergency contact, etc.
Forms are not required for check-in. They're independent of the Check-in Config. Only create one if you need it. Once created, attach to a Check-in Config or a Plan Config, and guests will fill it out in that flow.
Prerequisites
- None (can be created regardless of Check-in Config status)
Steps
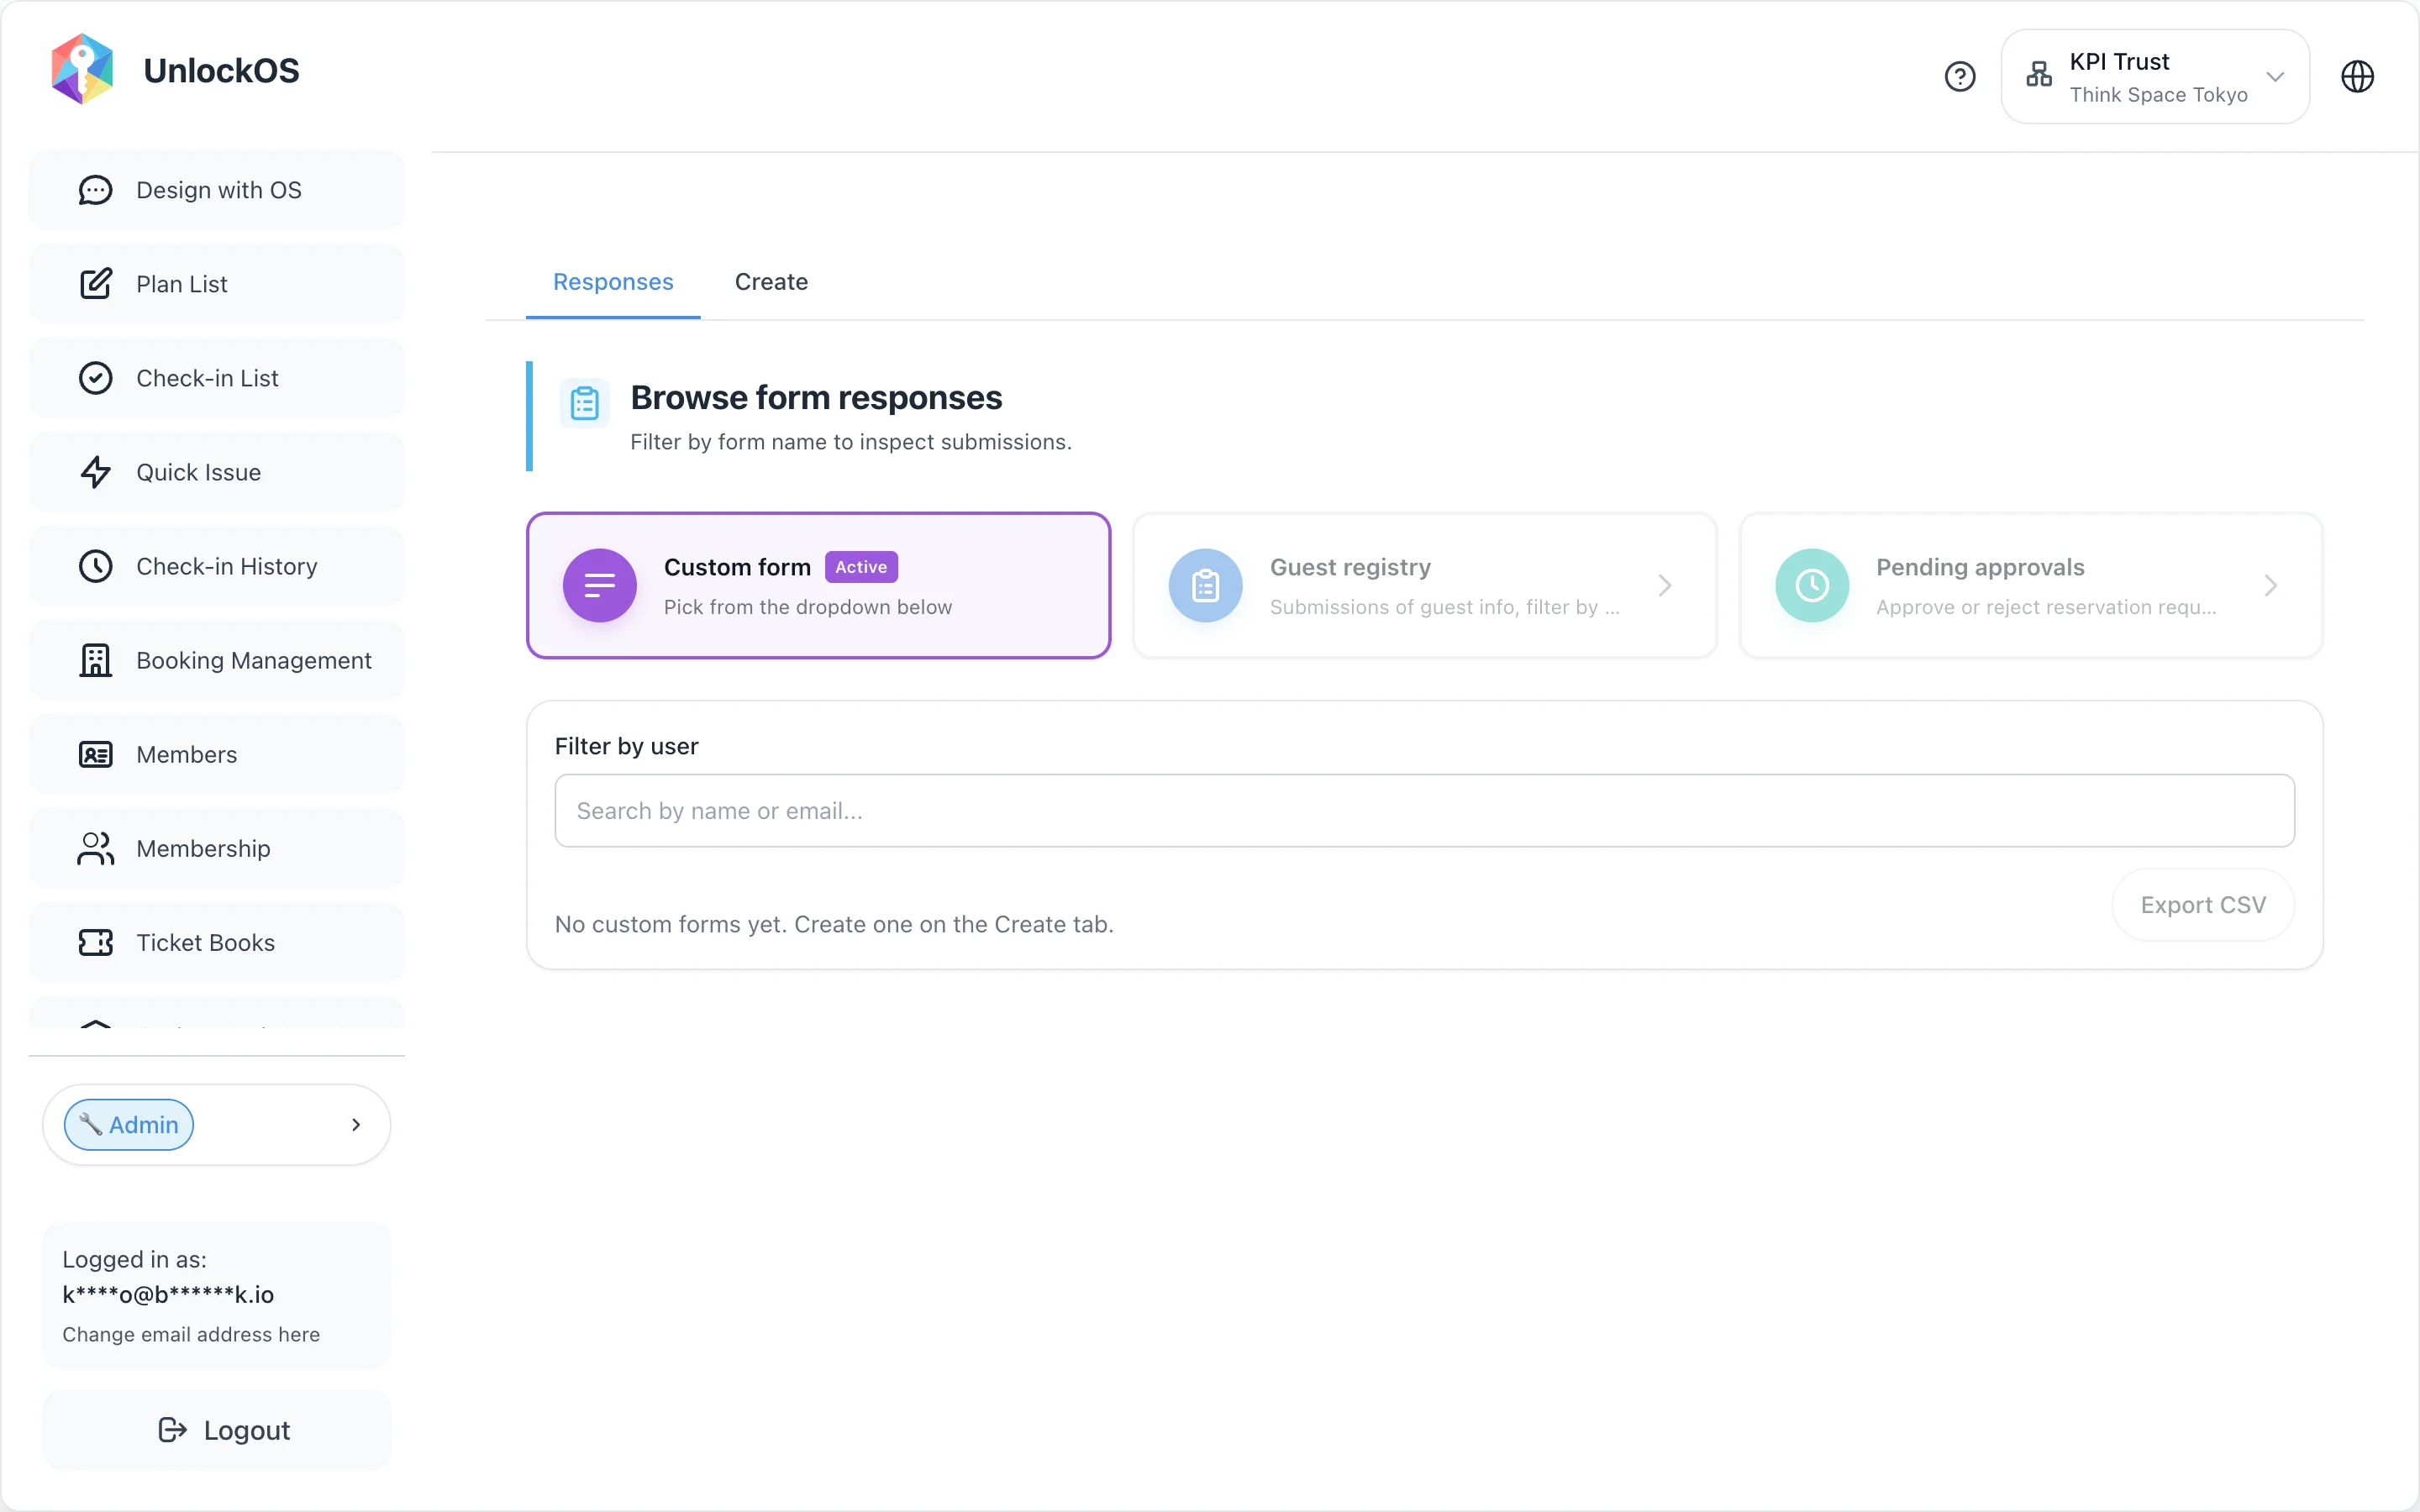
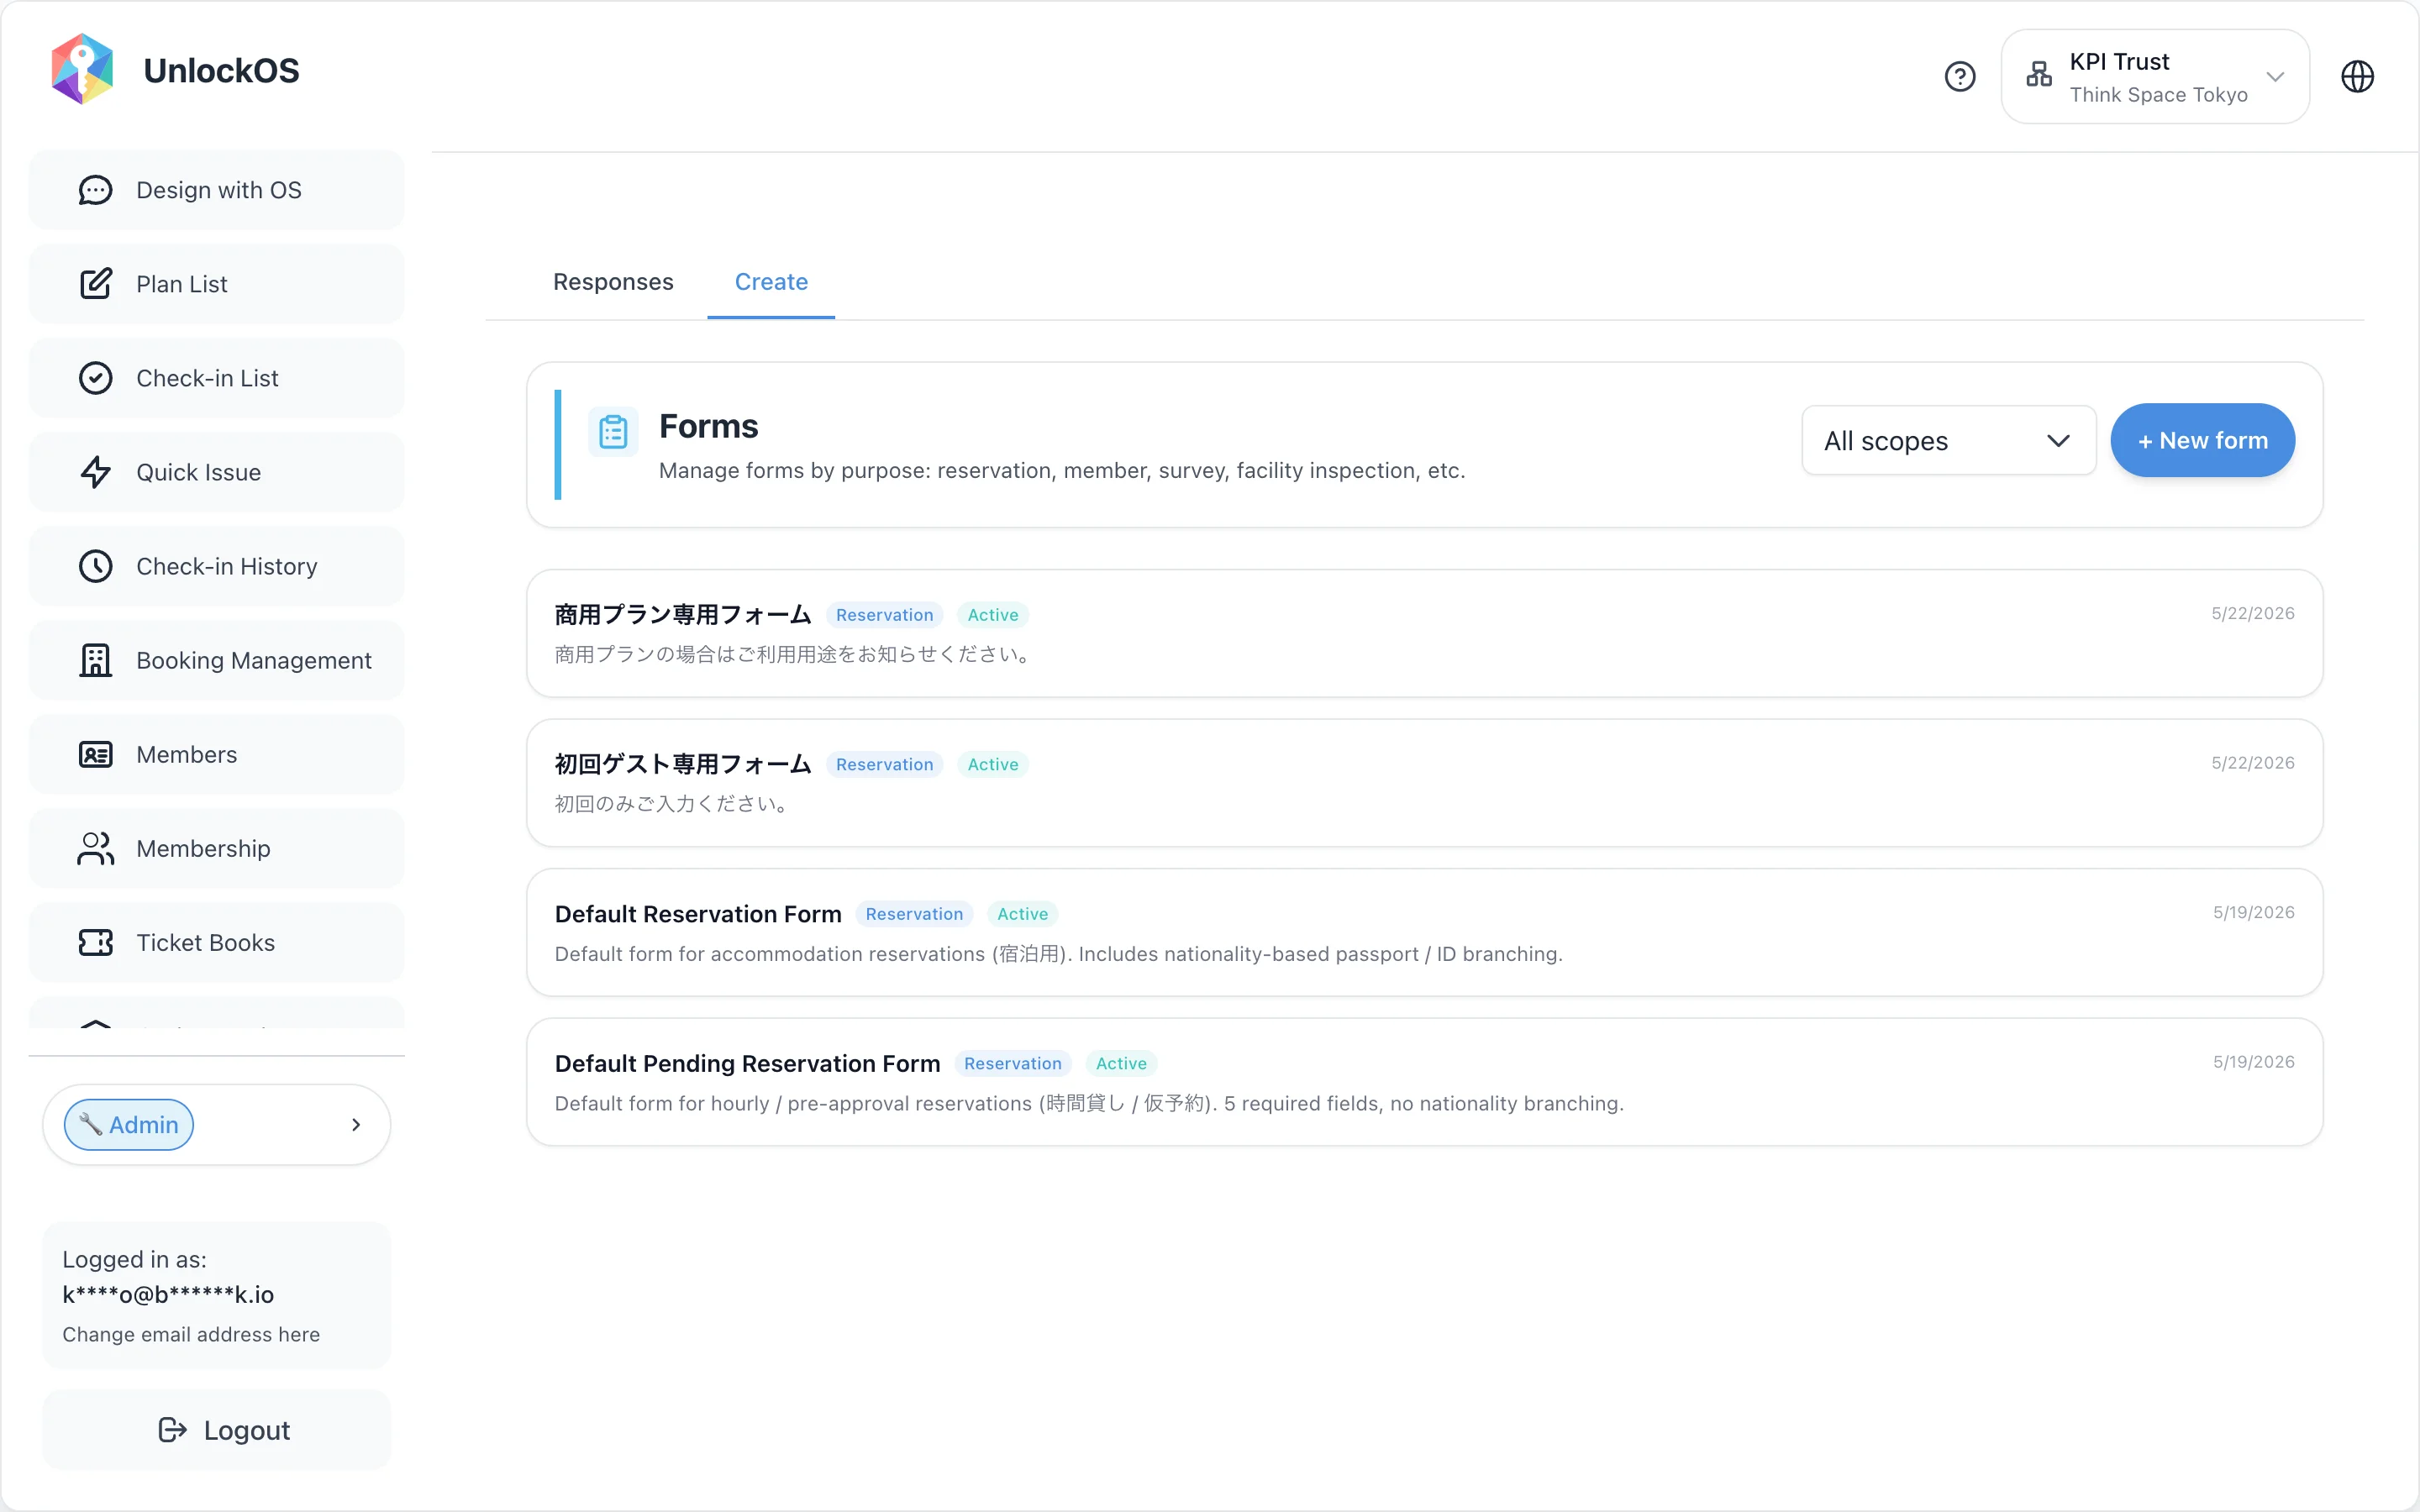
- Open Forms from the main app's left menu
- Select the Create tab (the default "Responses" tab is for past submissions)
- Click + New Form in the top-right
- Enter form name (e.g., "Check-in info form"), description, and scope (Booking / Check-in, etc.)
- Click Create Form to go to the form editor
- Add the required fields (text, image, signature, choice list, etc.)
- Set the host country (where the facility is located) — drives passport requirement branching by nationality
- Toggle status to "Public"
- After creating, attach to a Check-in Config (step 7), a Plan Config (step 5), or an iCal integration as needed
Verify
- The new form appears in the form list with a "Public" badge
- The form shows up as an option in the attachment point (Check-in Config / Plan Config / iCal integration)
Details
Step 9: Test booking in the Booking app
Purpose
Run one real booking end-to-end as a guest to confirm everything works.
Prerequisites
- Steps 1–5 complete
- Optionally steps 6, 7, 8 complete
Steps
- Open the booking URL copied in step 5 (
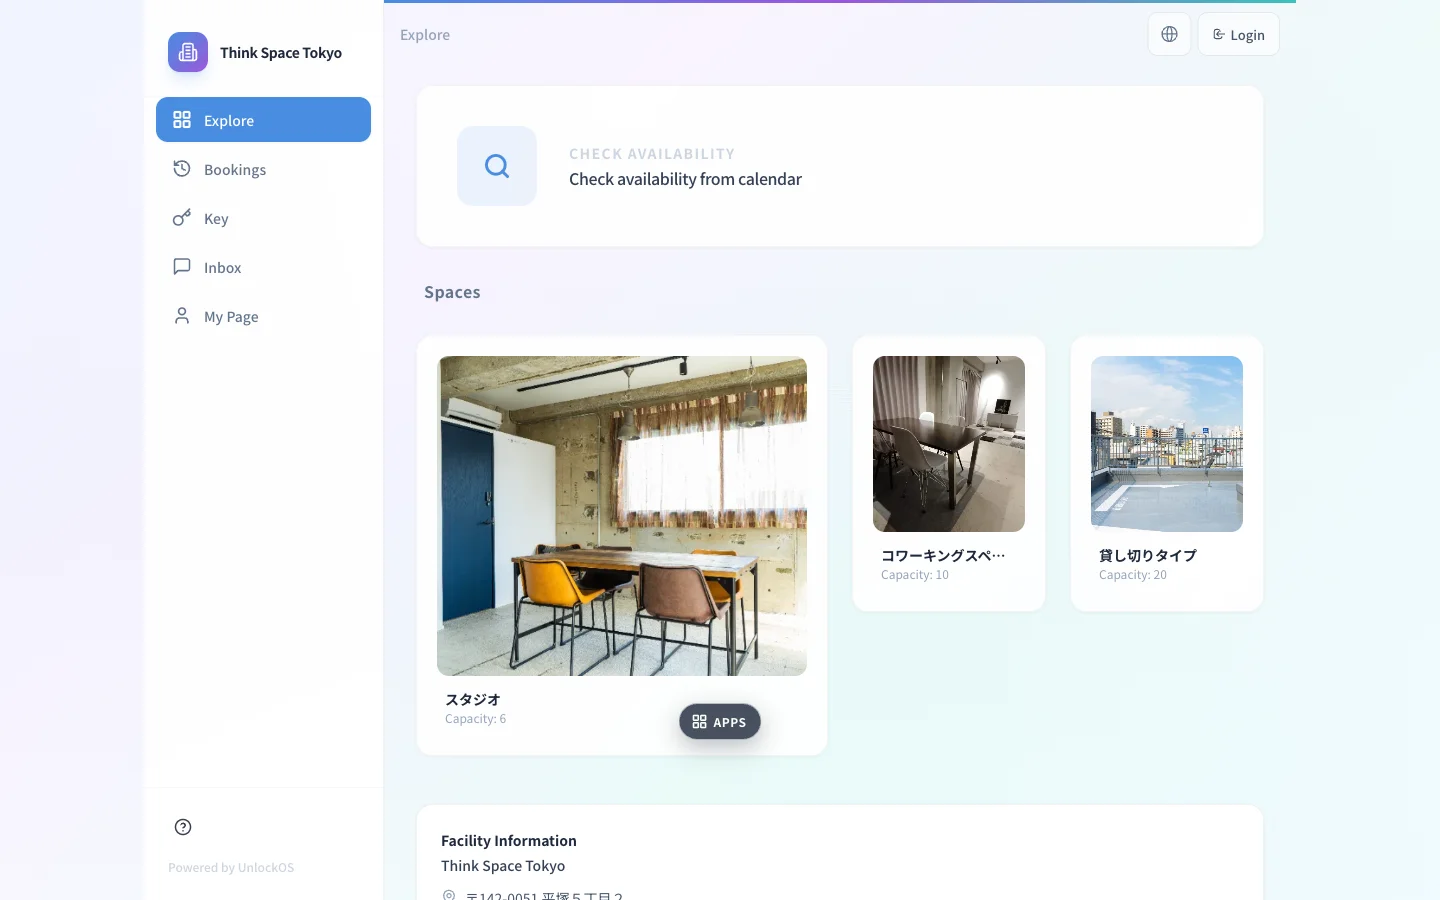
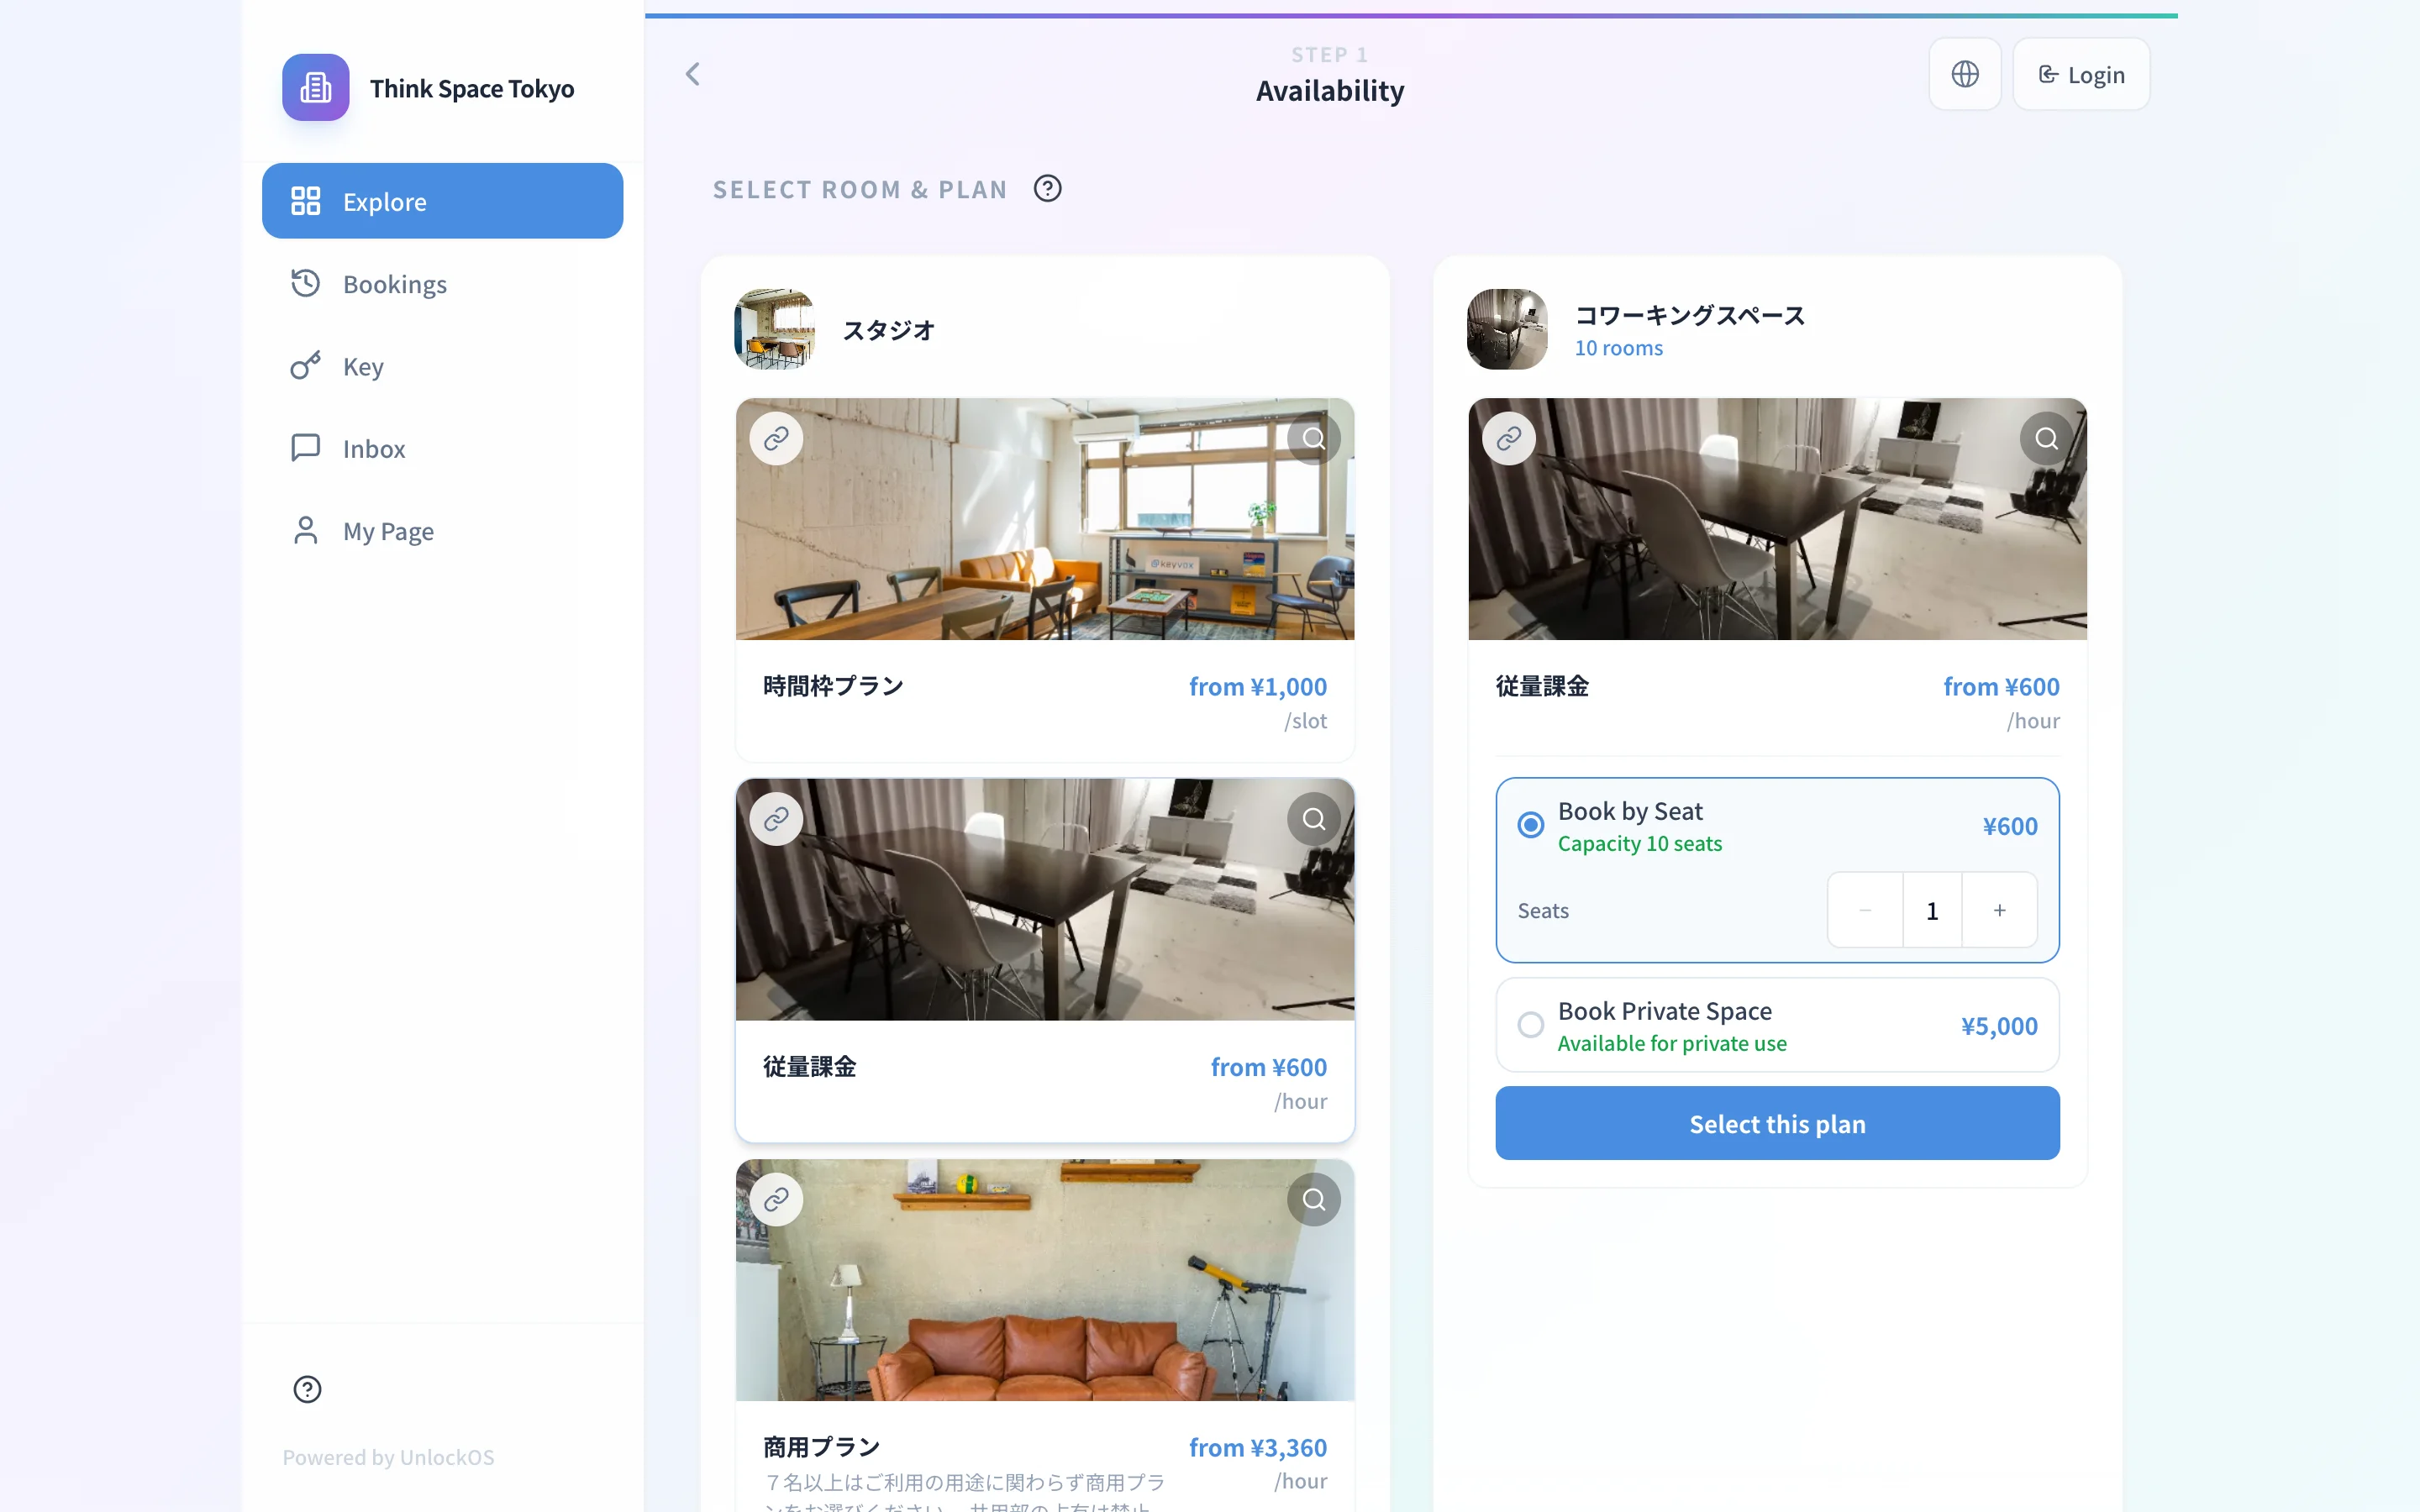
https://booking.unlockos.io/{slug}?config=<config_id>) in a fresh browser window (incognito preferred) - The landing shows the Spaces list — confirm room types and plans look right
- Click a room type and pick a plan on Availability (SELECT ROOM & PLAN), choose date/time, proceed to the booking form
- Enter a test guest name and email
- Pay with the Stripe test card (
4242 4242 4242 4242/ any future date / any CVC) - After confirmation, check that the new reservation appears in Booking > Reservations
- Open the reservation detail and verify the access code (key code) is issued
- If step 6 is complete: check that the event is written to Google Calendar
- If step 7 (Check-in Config) is complete: open the offered check-in URL and walk through the self-check-in flow
- If step 8 (Forms) is complete and attached: verify the form displays and submits correctly
Verify
| Item | How |
|---|---|
| Guest-side shows correct room types, plans, prices | Open the booking URL |
| Booking is accepted | Payment success screen appears |
| Entry appears in Booking management | Booking > Reservations |
| Key code is issued | Reservation detail drawer |
| The lock matches the room | Compare reservation detail lock vs Rooms list assignment |
| Event is written to Google Calendar (optional) | Check Google Calendar |
After testing
- Cancel the test booking from the Cancel button
- Before going live, re-confirm the booking URLs you distribute via your site / email / social
- Set up iCal integrations (if you want to import bookings from OTAs like Airbnb):
Setup Completion Checklist
Once everything is checked, you're ready to take real bookings.
Required
- KEYVOX integration shows "Connected" (facilities that issue keys only)
- Stripe integration shows "Connected" (facilities accepting online payments only)
- Slug set, booking URL is in
booking.unlockos.io/{slug}format - At least one Room Type created
- At least one Room created, each linked to a Room Type
- Every room has a KEYVOX lock assigned (facilities that issue keys only)
- At least one Plan created (Accommodation / Hourly / TimeSlot / Flat + Overtime)
- Booking > Plan Config has at least one Room Type × Plan mapping
- Test booking succeeded and a key code was issued
Optional
- Google Calendar integration shows "Connected"
- Check-in Config created
- Form Config created
- iCal integration set up (Airbnb, etc.)
Common stumbles
Q: A Room Type isn't showing up on the guest-facing booking page
A Room Type only appears if it's mapped in Booking > Plan Config's "Room Type × Plan" section. Re-check step 5.
Q: I created a plan but it doesn't appear in Plan Config
"Daily flat" and "One-time" plans can't be sold via booking URLs. Re-create as one of Accommodation / Hourly / TimeSlot / Flat + Overtime.
Q: No lock options show up when I edit a room
The KEYVOX integration may have been disconnected. Go back to step 1 and verify "Connected," reconnect if needed.
Q: Test booking went through, but no key code was issued
Check in this order:
- Is a lock assigned to the room in step 3-4?
- Is KEYVOX integration "Connected" (step 1)?
- Is the door enabled on the KEYVOX dashboard side?
Q: The booking screen says "Booking must be made N hours before start"
The advance booking lead time (min_advance_hours) on the Plan Config (step 5) isn't satisfied. For testing, pick a far-enough date/time or temporarily shorten the lead time.
Q: It says "Can only book up to N days from today"
Exceeds the max advance days (max_advance_days) on the Plan Config (step 5). Default is 90 days.
Q: Stripe connected but I get "Invalid payment method"
The Stripe Connect onboarding (identity verification, bank account registration) may be incomplete. Check the account status in the Stripe dashboard.
Q: I changed settings but the booking screen doesn't reflect them
The guest browser may be caching. Open in an incognito window, or hold the reload button for a hard refresh.
Support
If you've followed the guide and still can't resolve the issue, contact support with which step and what happened (attach a screenshot of the error message if possible). "It's not working" alone makes diagnosis slow.
Related pages
Per-step details
- Step 1: Lock Connection (KEYVOX)
- Step 2: Lock Connection (Stripe)
- Step 3: Base Settings / Connecting Rooms
- Step 4: Plan List / Plan Form / Week-grid / TimeSlot booking
- Step 5: Booking / Reservation Config Form
- Step 6: External Integrations hub / Google Calendar integration
- Step 7: Check-in Config
- Step 8: Forms
- Step 9: iCal integration / Guest Booking App / Guest Check-in